Supplier's platform
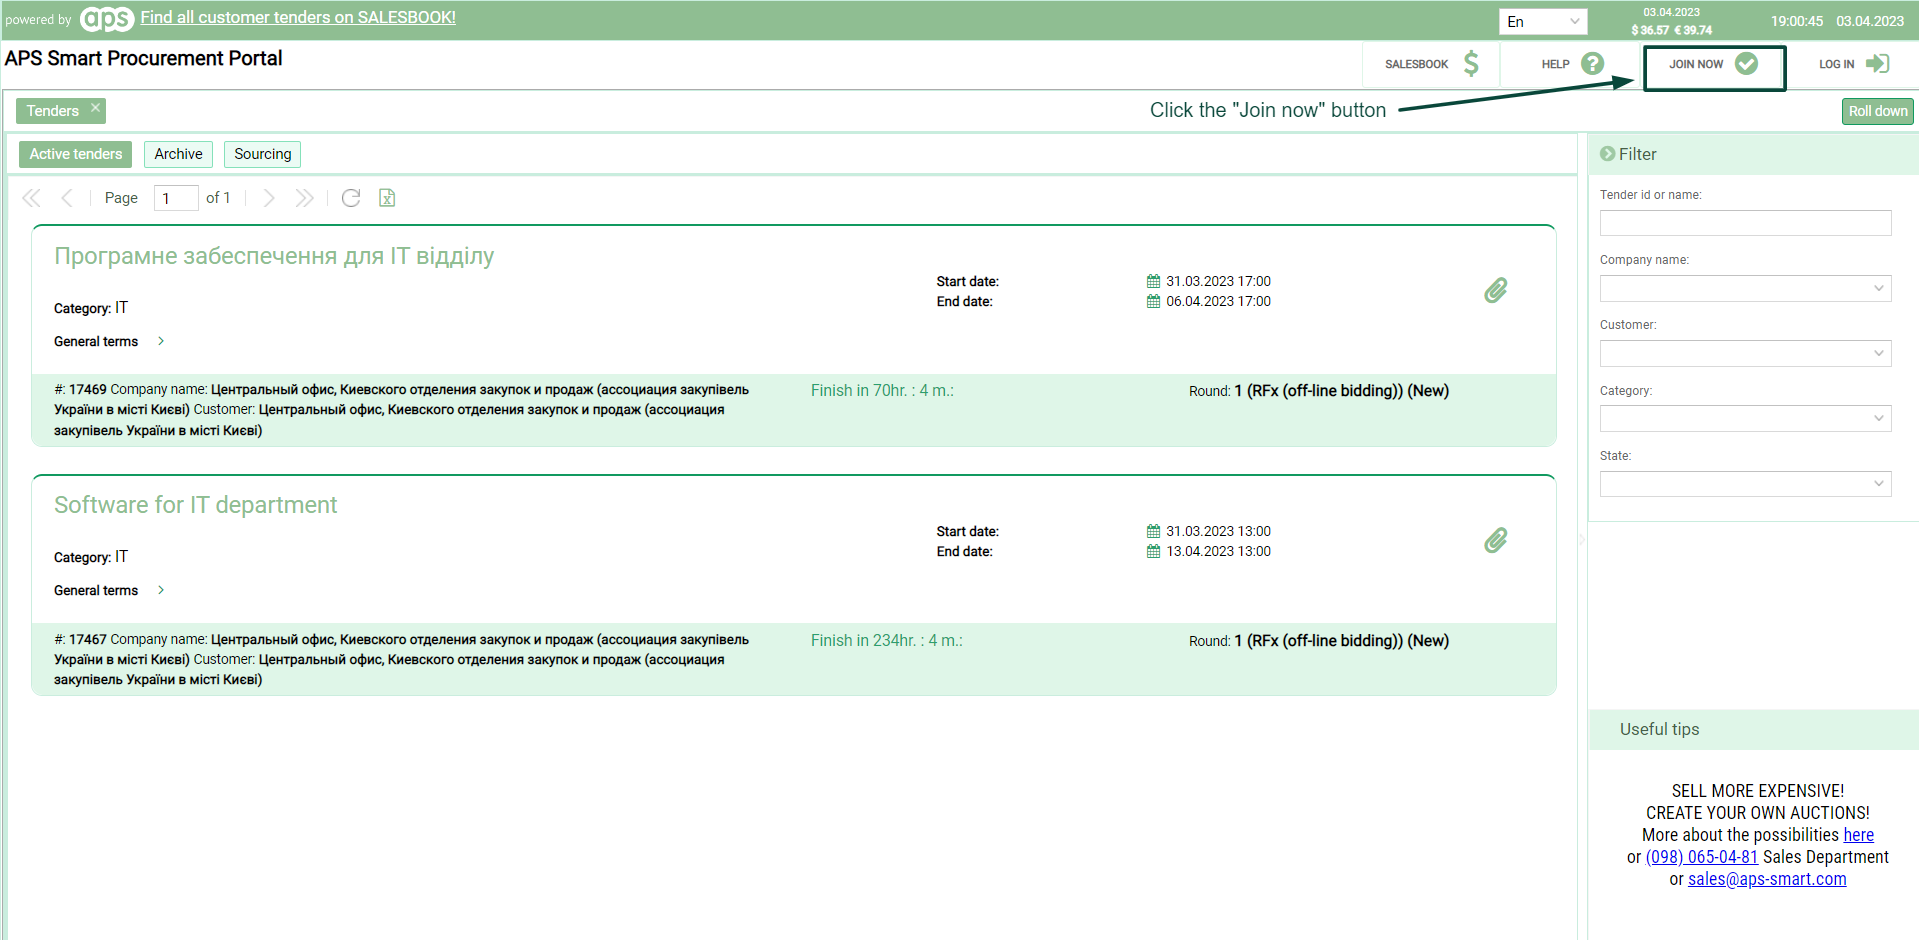
To get registered in the APS system, click the "Join now" button (see Pic. 1). The button is located in the upper right-hand corner of the screen.
Picture 1
After that, you will have to complete 5 (five) registration steps. Note that all mandatory fields are marked with a red star "*".
The first registration step.
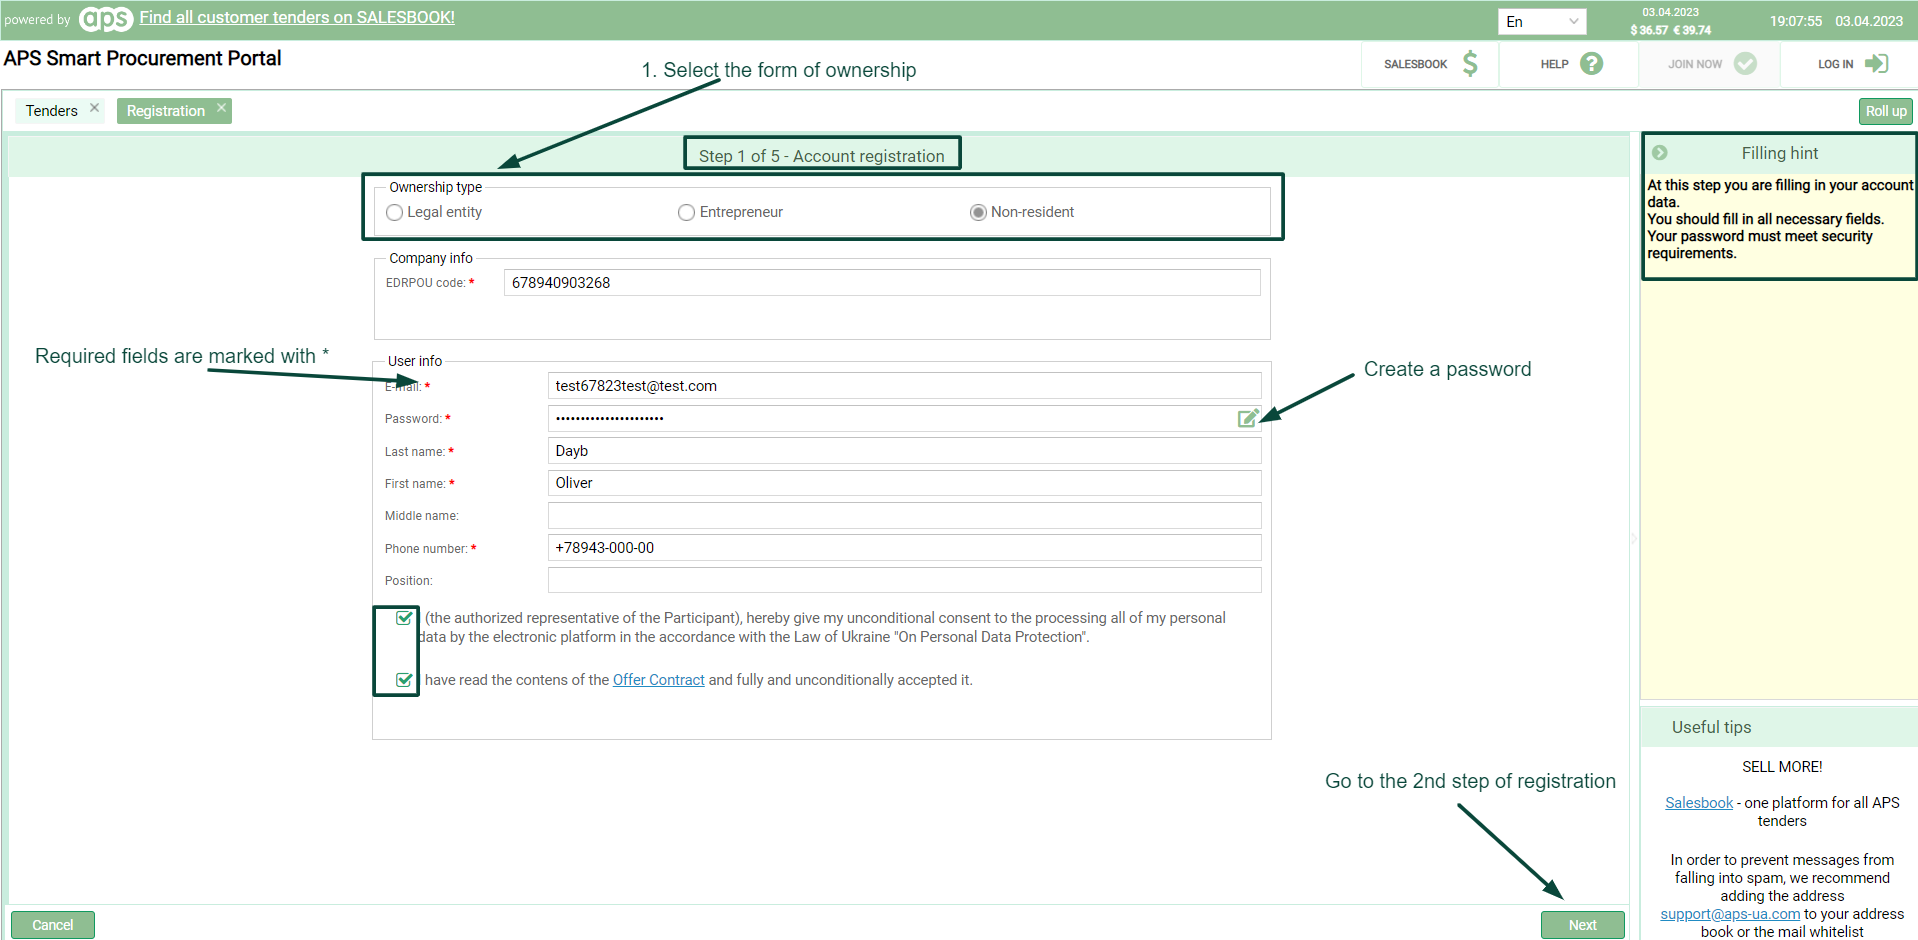
Fill in the registration details to log into your user account. After that, press "Next" (see pic. 2). If your company does not have an EDRPOU code, fill in this field with digital data so that you can be identified.
Picture 2
The second registration step.
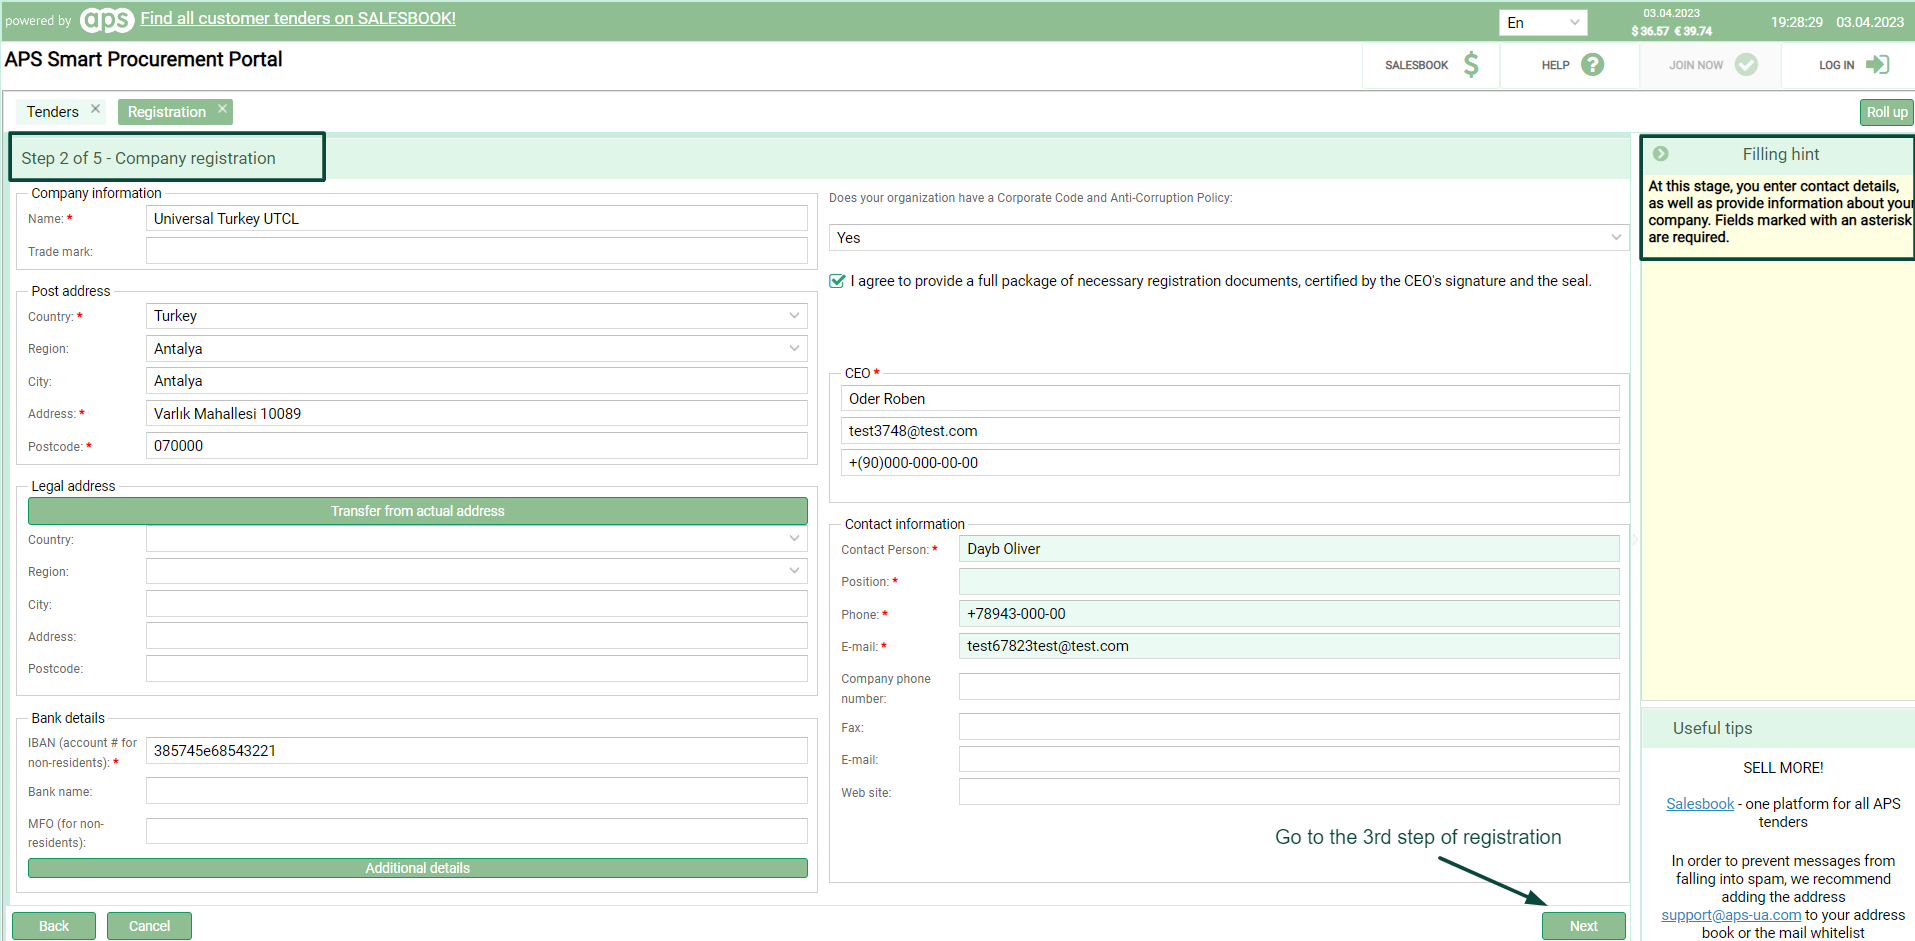
Fill in your company registration details. After that, press "Next" (see pic. 3). Blank fields will get highlighted in red.
Picture 3
The third registration step.
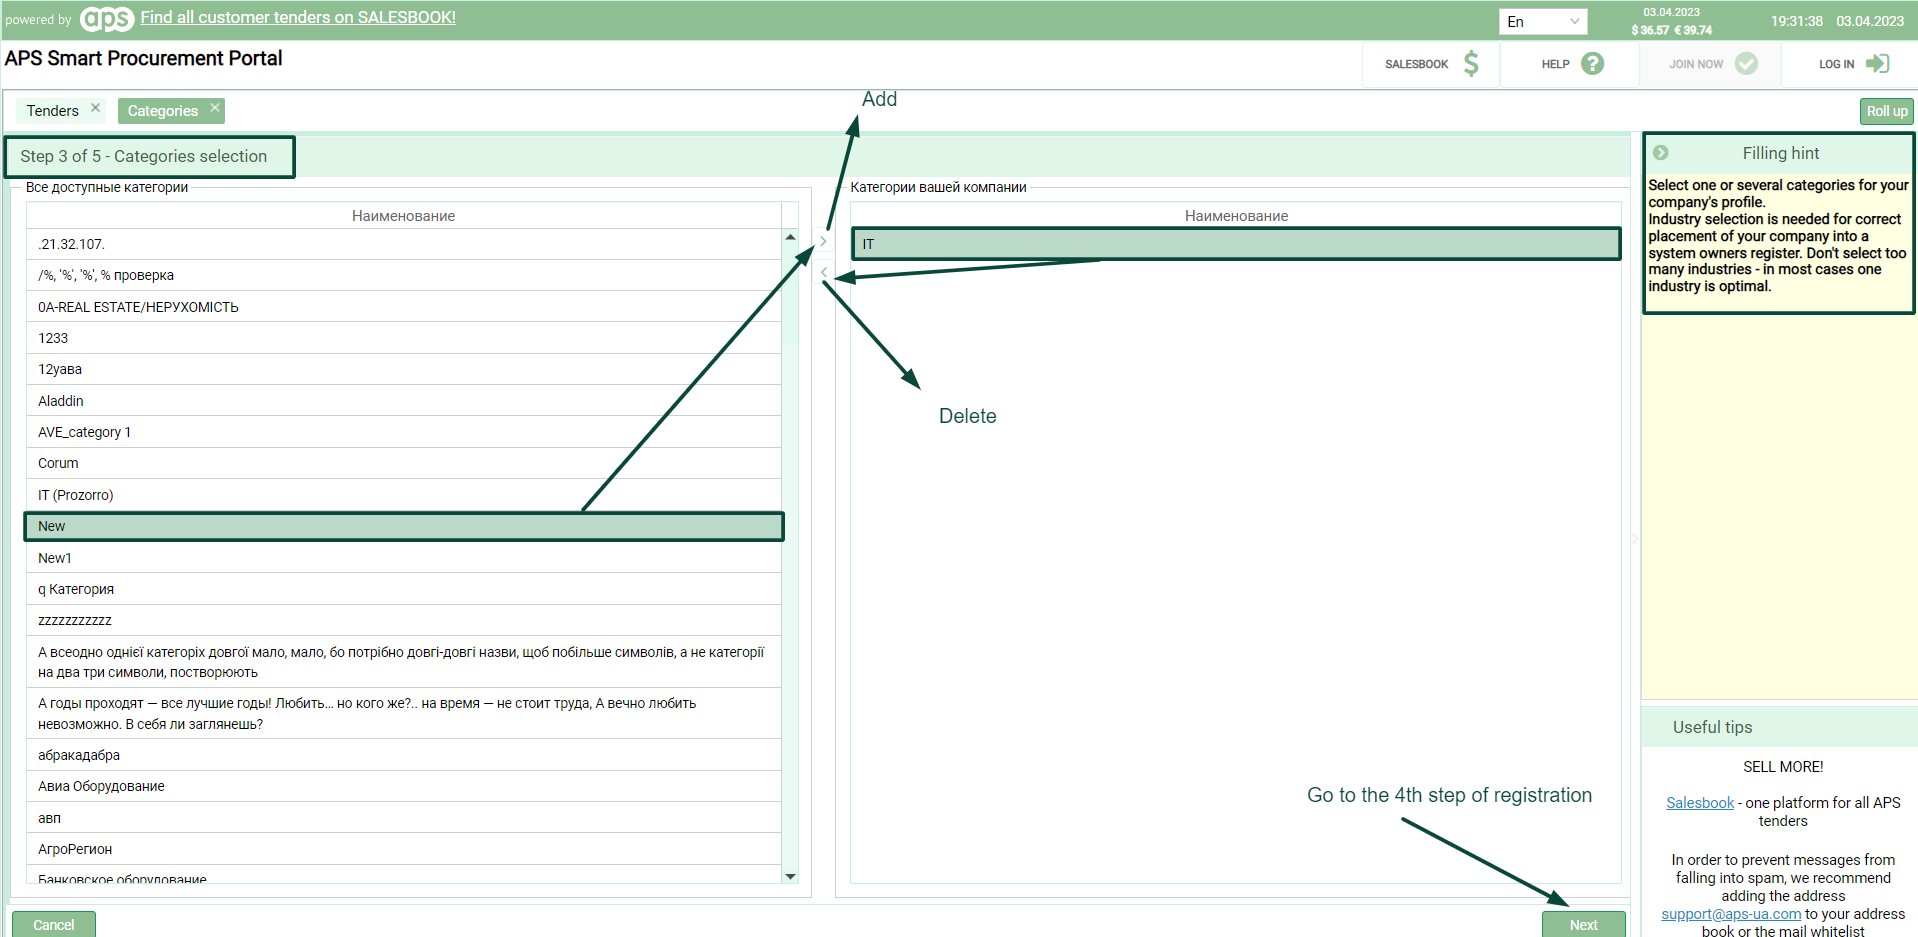
Select the categories (one or more) that better correspond to the type of activity of your enterprise. This is required for further receipt of invitations to future tenders (see pic. 4). If you do not want to receive tender invitations, this step is optional.
Picture 4
The fourth registration step.
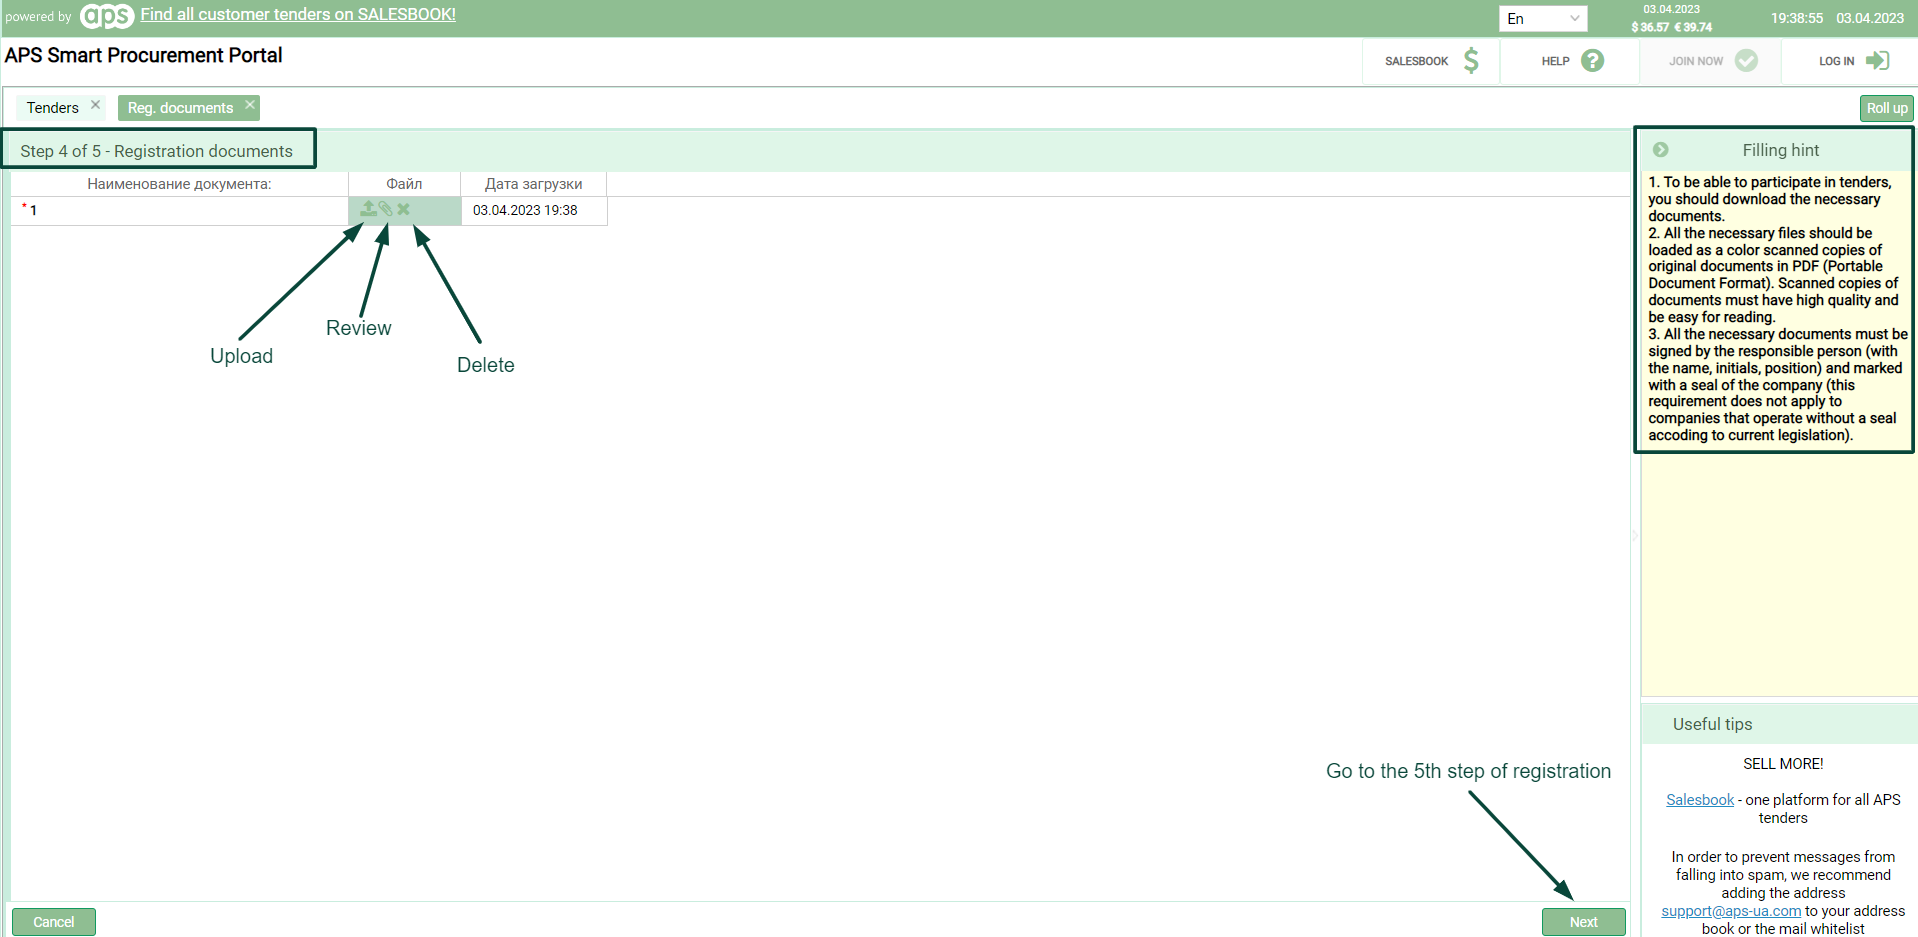
Attach the registration documents specified by the Customer (see pic. 5). The file size must not exceed 5 MB.
Picture 5
If you did not see the 4th or 5th registration steps, it means that these steps are not applicable to this site.
The fifth registration step.
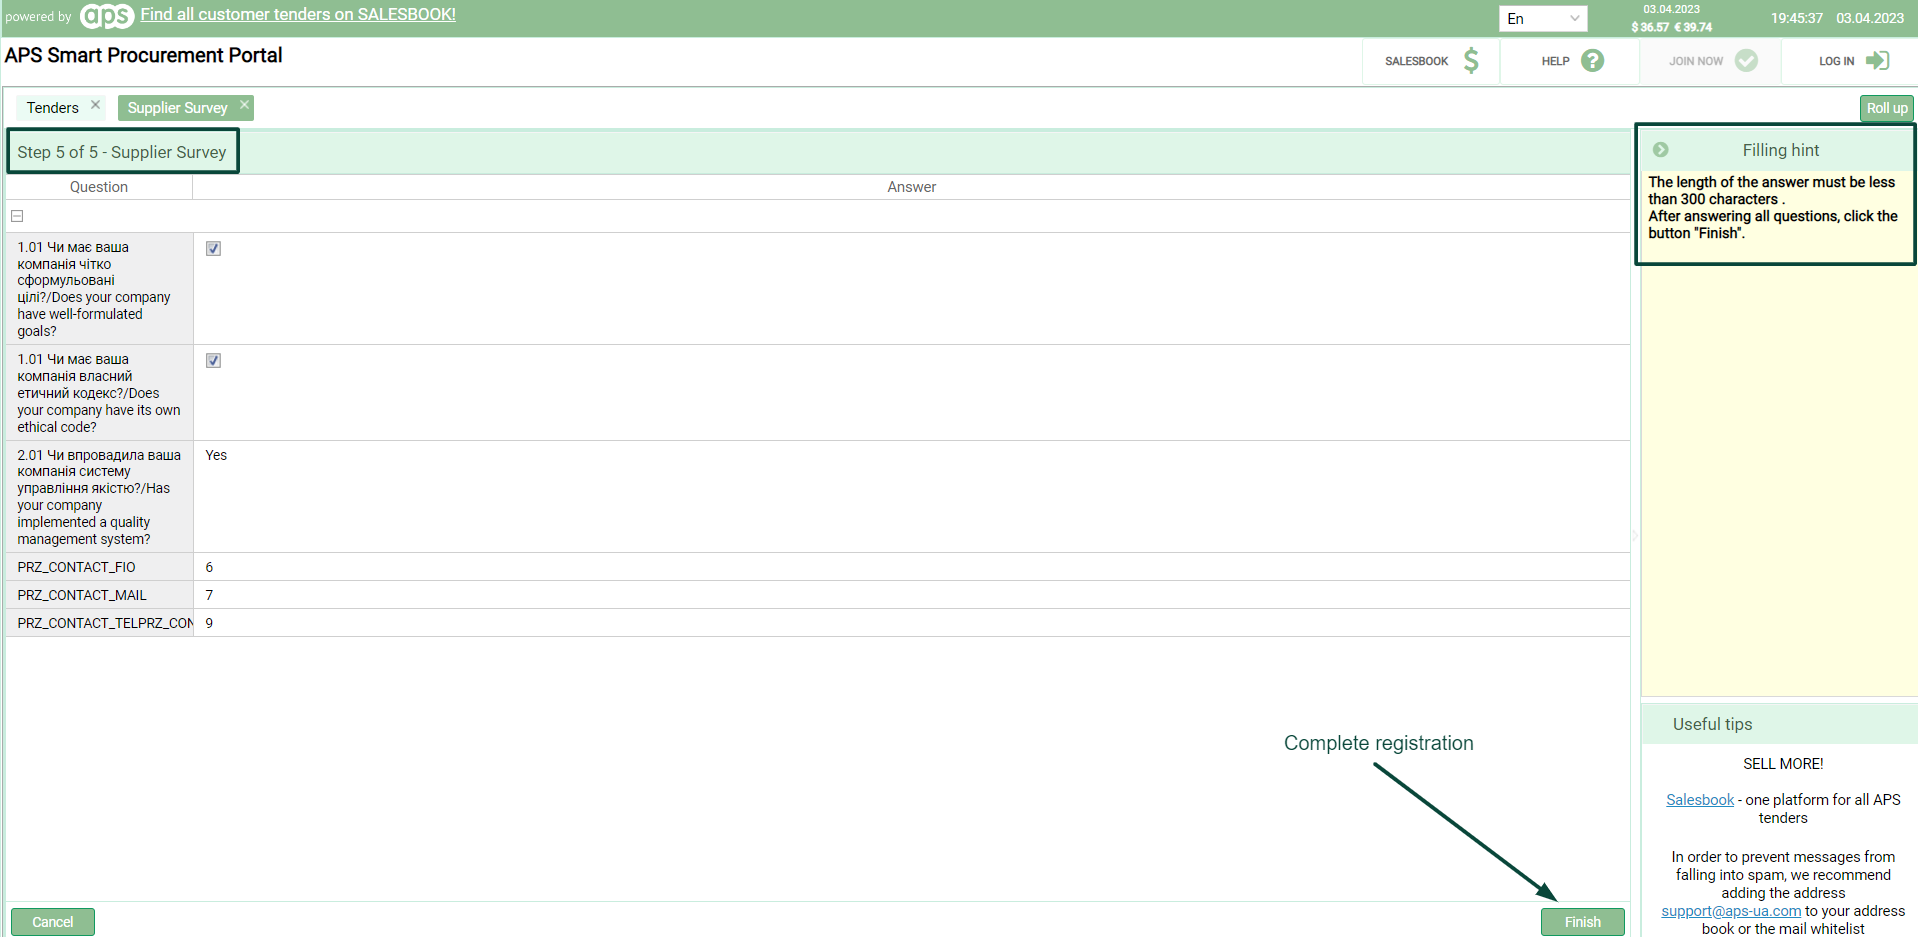
Here you have to provide answers to the questions set by the Customer in the Supplier Survey (see pic. 6).
Picture 6
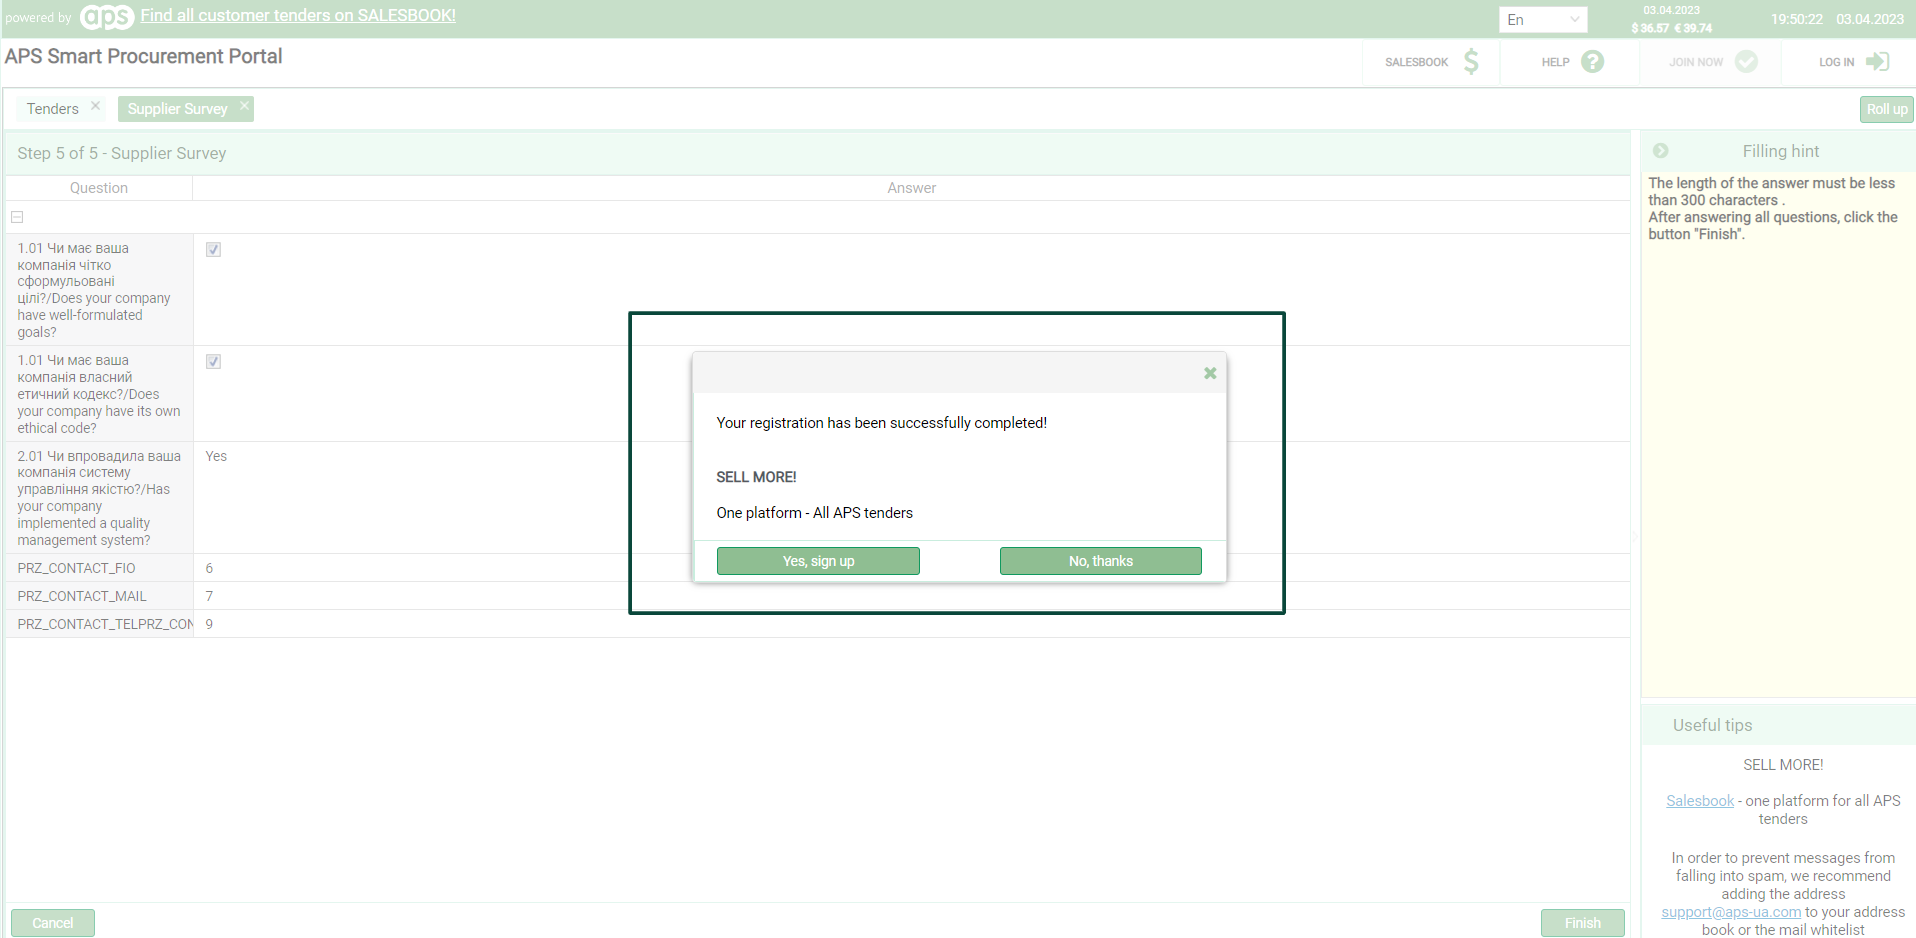
After successful registration, the corresponding notification will appear (see pic. 7).
Picture 7
In addition, you have access from the user account to the Salesbook trading platform, where you have the opportunity to learn about all the tenders that are currently being held through the APS system.
Buttons:
- "Yes, sign up ? opens the salesbook.com.ua link in a new tab
- "No, thanks" ? will take you to the main page of your account.
If necessary, you can edit the entered registration details in the corresponding section of your user account.
We wish you a successful use of the APS system.
Please, perform the following in order to recover your password:
-
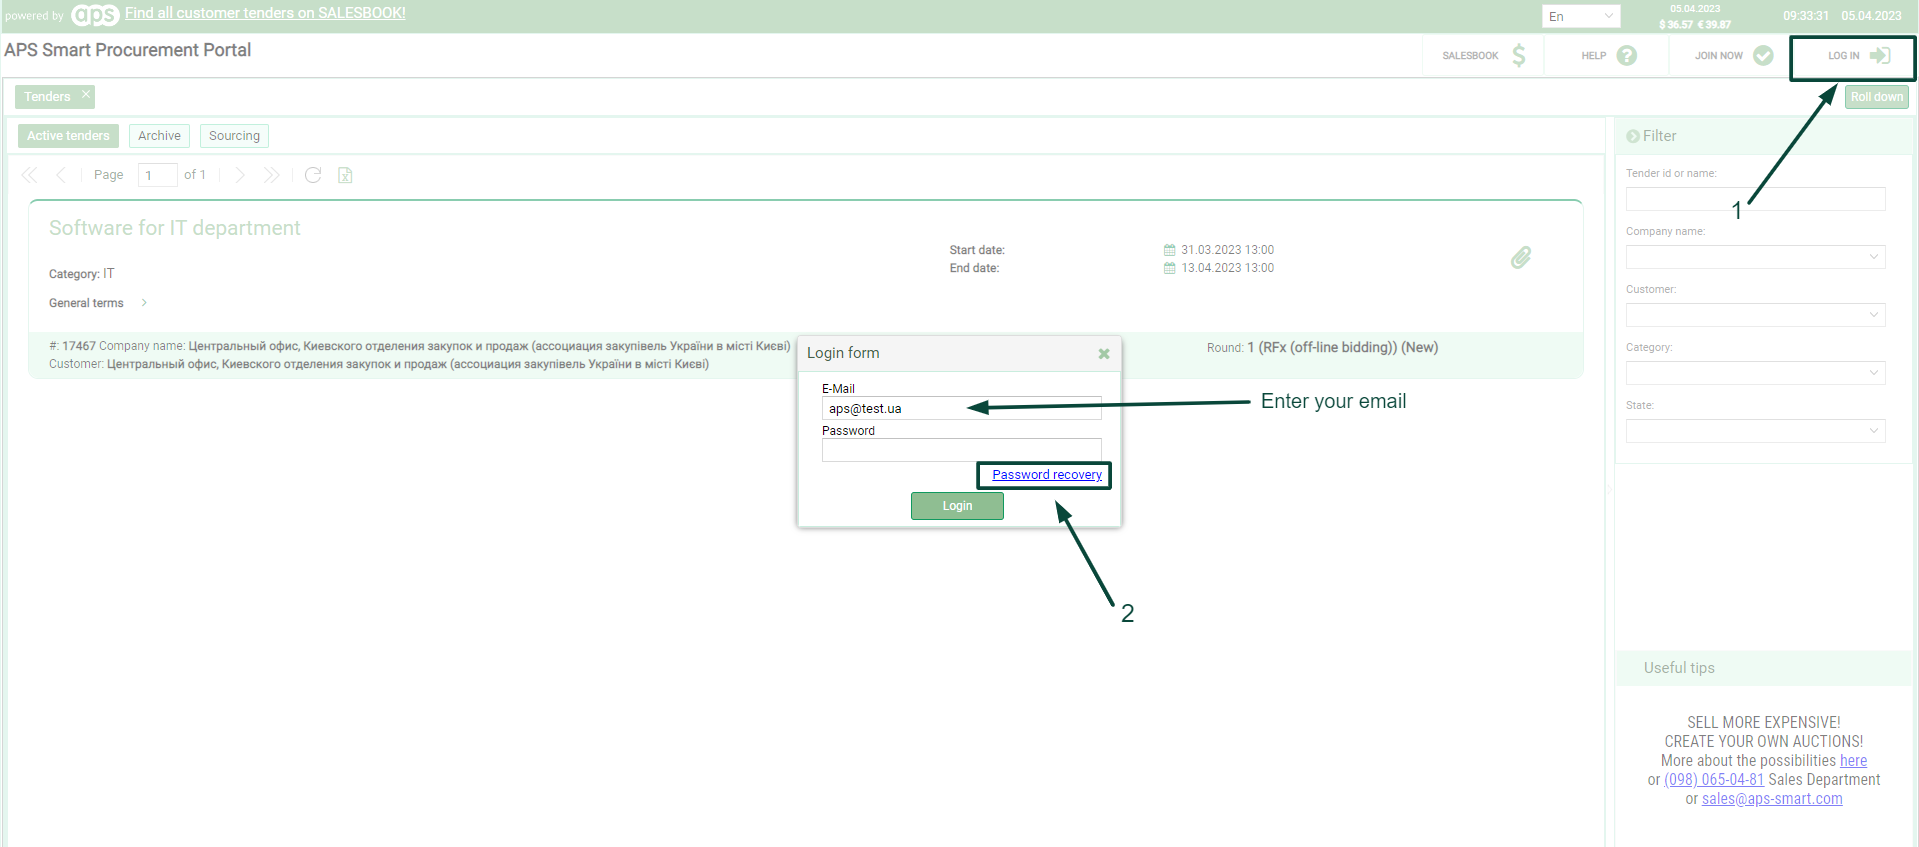
Log in to the system and click on the "Password recovery" inscription, which is located below the authorization fields (see pic. 1).
Picture 1
-
Next, enter the e-mail address to which you want to receive instructions on the password recovery (see pic. 2).

Picture 2
-
You will see the message that instructions for changing the password have been sent to you (see pic. 3).
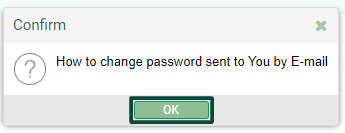
Picture 3
-
The email you receive will contain a link generating a password. You should click on the link and wait for the next email containing a new password (see pic. 4).
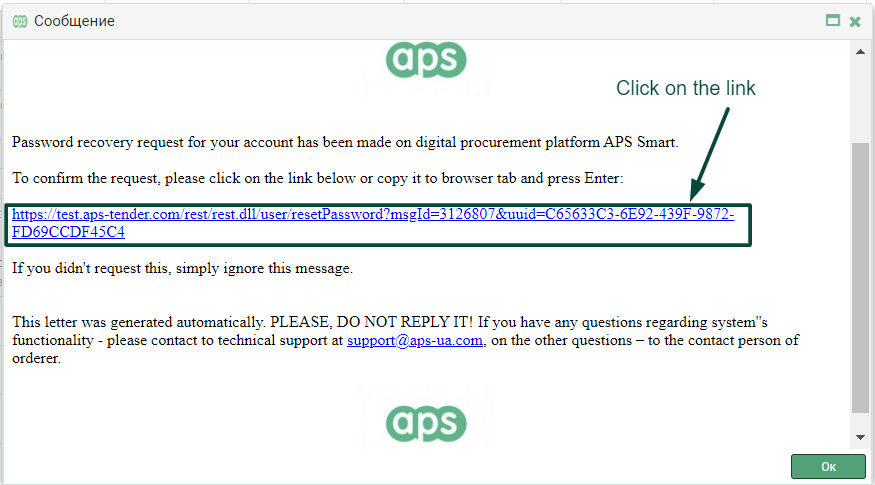
Picture 4
-
5. Pay special attention; your new password will be displayed in quotation marks. You should copy it without quotes (see pic. 5). Next, log in to your user account using the data specified in the email: your login remains the same, and the password is the one specified in the email (you have to copy it without quotes).
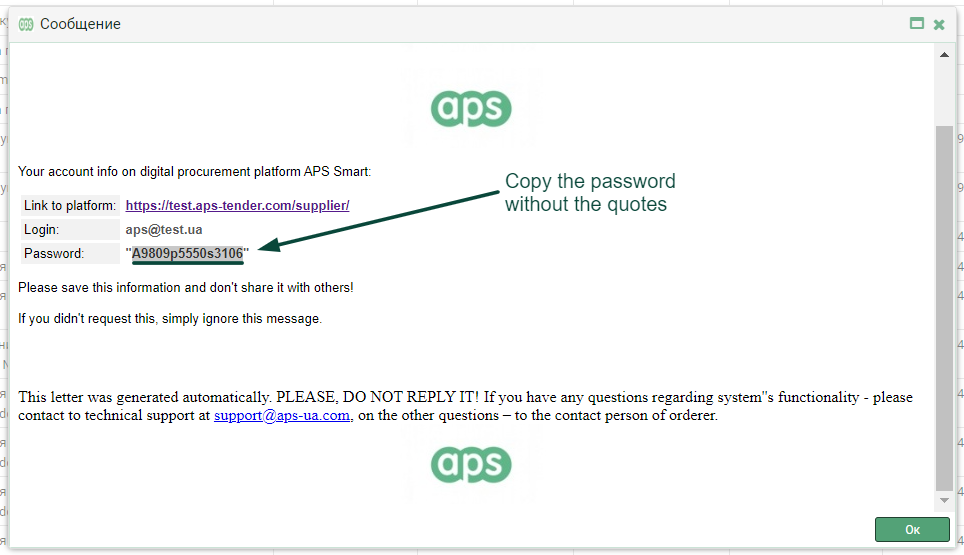
Picture 5
In order to be able to edit the company data after the registration is completedyou should log in and open the "Settings" module in the menu (see pic. 1).

Picture 1
If you need to edit information about the company, open the "Company information" menu block (see pic. 2). Editable fields are displayed in white, and non-editable fields are displayed in gray. After making changes, click the "Save" button in the lower right-hand corner of the page on your screen.

Picture 2
To change the list of categories for which you would like to receive invitations to future tenders, open the "Categories" menu block and add or remove categories. This information duplicates the data that you filled in at the third stage of the registration. Changes are automatically saved (see pic. 3).
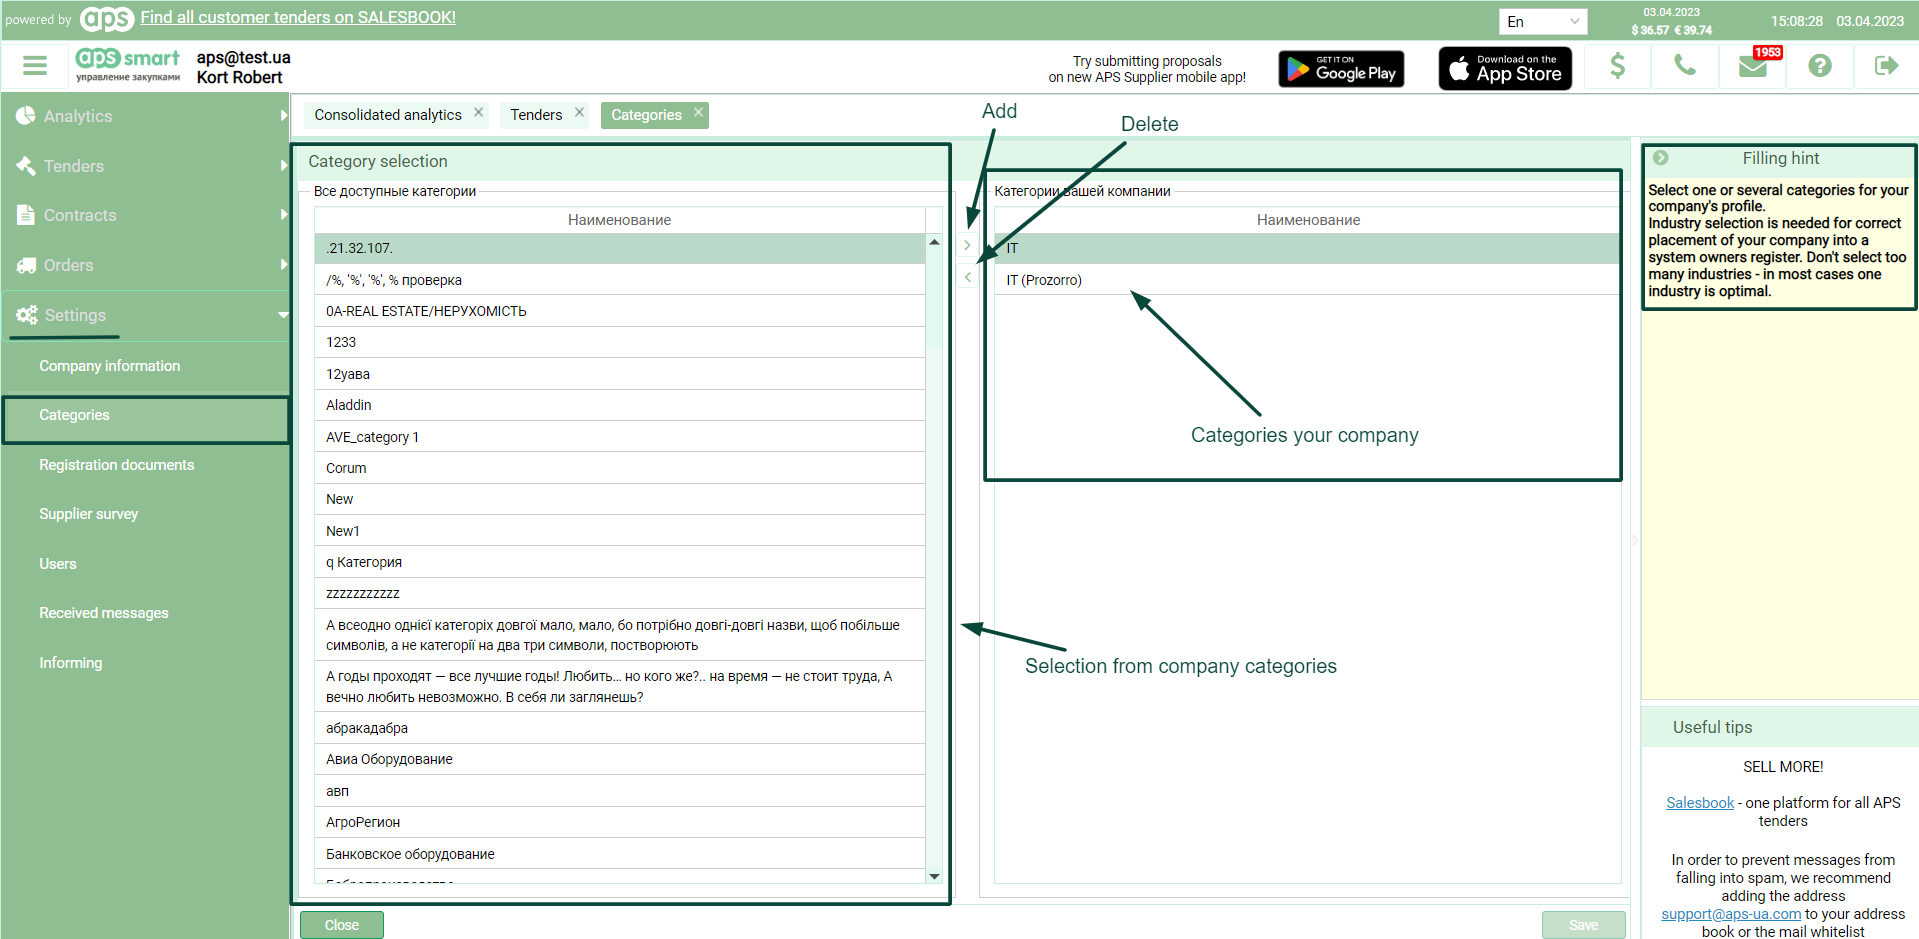
Picture 3
To review the initially attached documents, open the "Registration documents" menu block (see Pic. 4). This information duplicates the data that you filled in at the fourth stage of the registration.
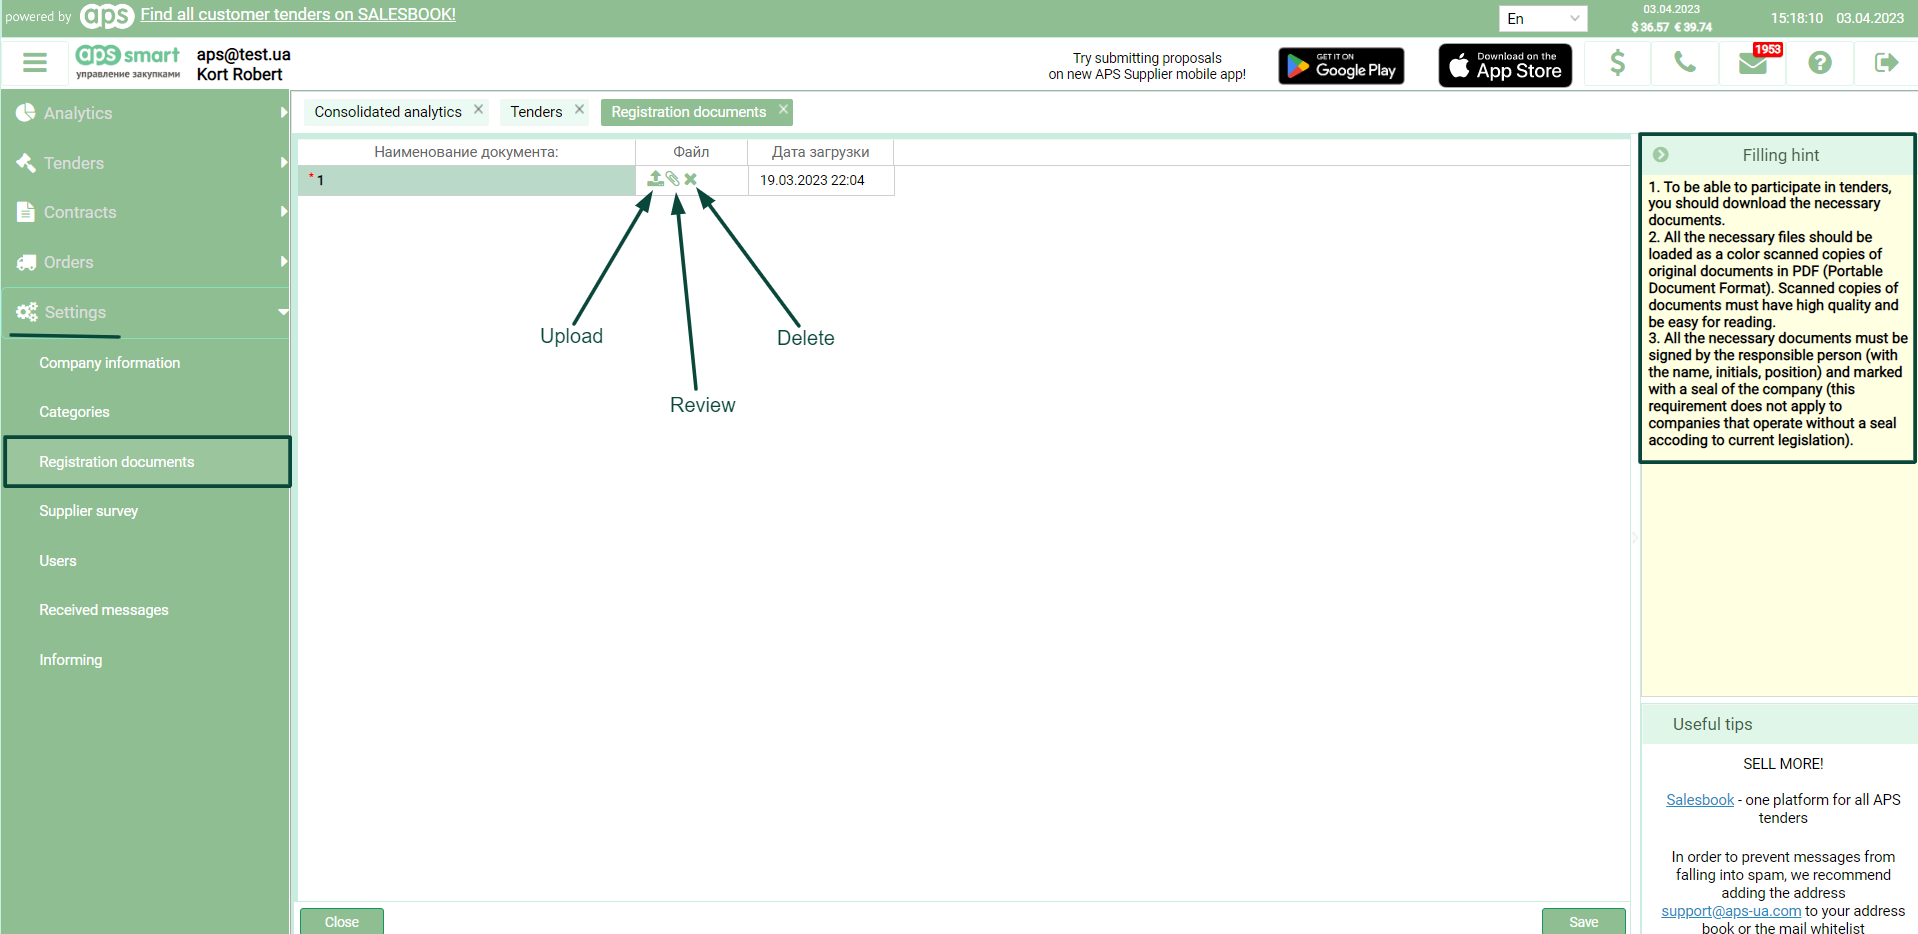
Picture 4
To change the answers to the questions in the survey provided by the Ordering party, open the "Supplier survey" menu block (see pic. 5). This information duplicates the data that you filled in at the fifth stage of the registration.
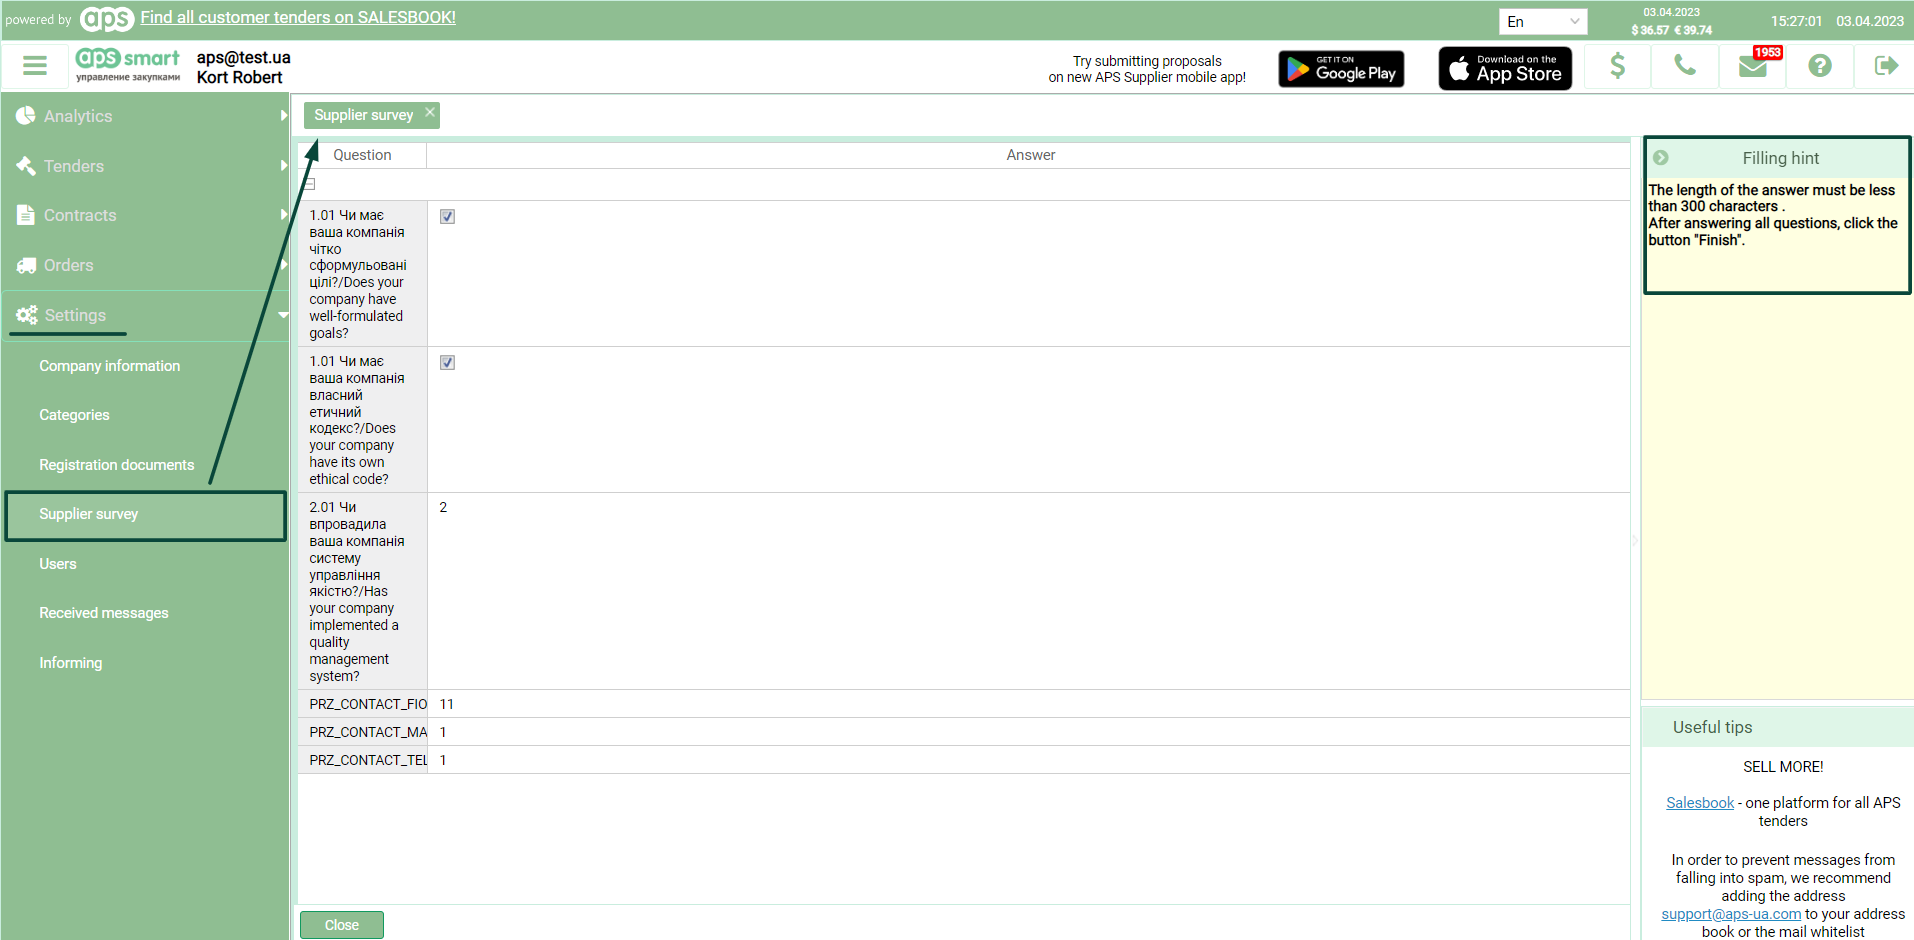
Picture 5
In order for you to be able to manage users, open the sidebar, the "Settings" module, and the "Users" block (see pic. 1). In this block, you can manage users (add, delete, edit).

Picture 1
To add a new user, press the "+" button above the list of users. The "User Editor" area will become active for you, where you need to enter data (see pic. 2).
- It is enough to fill in the required fields (required fields are marked with a red star "*"), all other fields are optional.
-
Set the check boxes to the required values.
— Change the password at login - after each authorization in the personal account, the user will need to change the password.
— Block user - blocks the user
— Administrator - has access to the configuration module and can make changes to the settings.
— Contact person - set the contact person in the Company data section.
Save the data by clicking the "Save», button.


Picture 2
After the above-mentioned actions, the new system user will be added to the "User list" (see pic. 3.). Basic information about the status of all users, including you, will be displayed there.
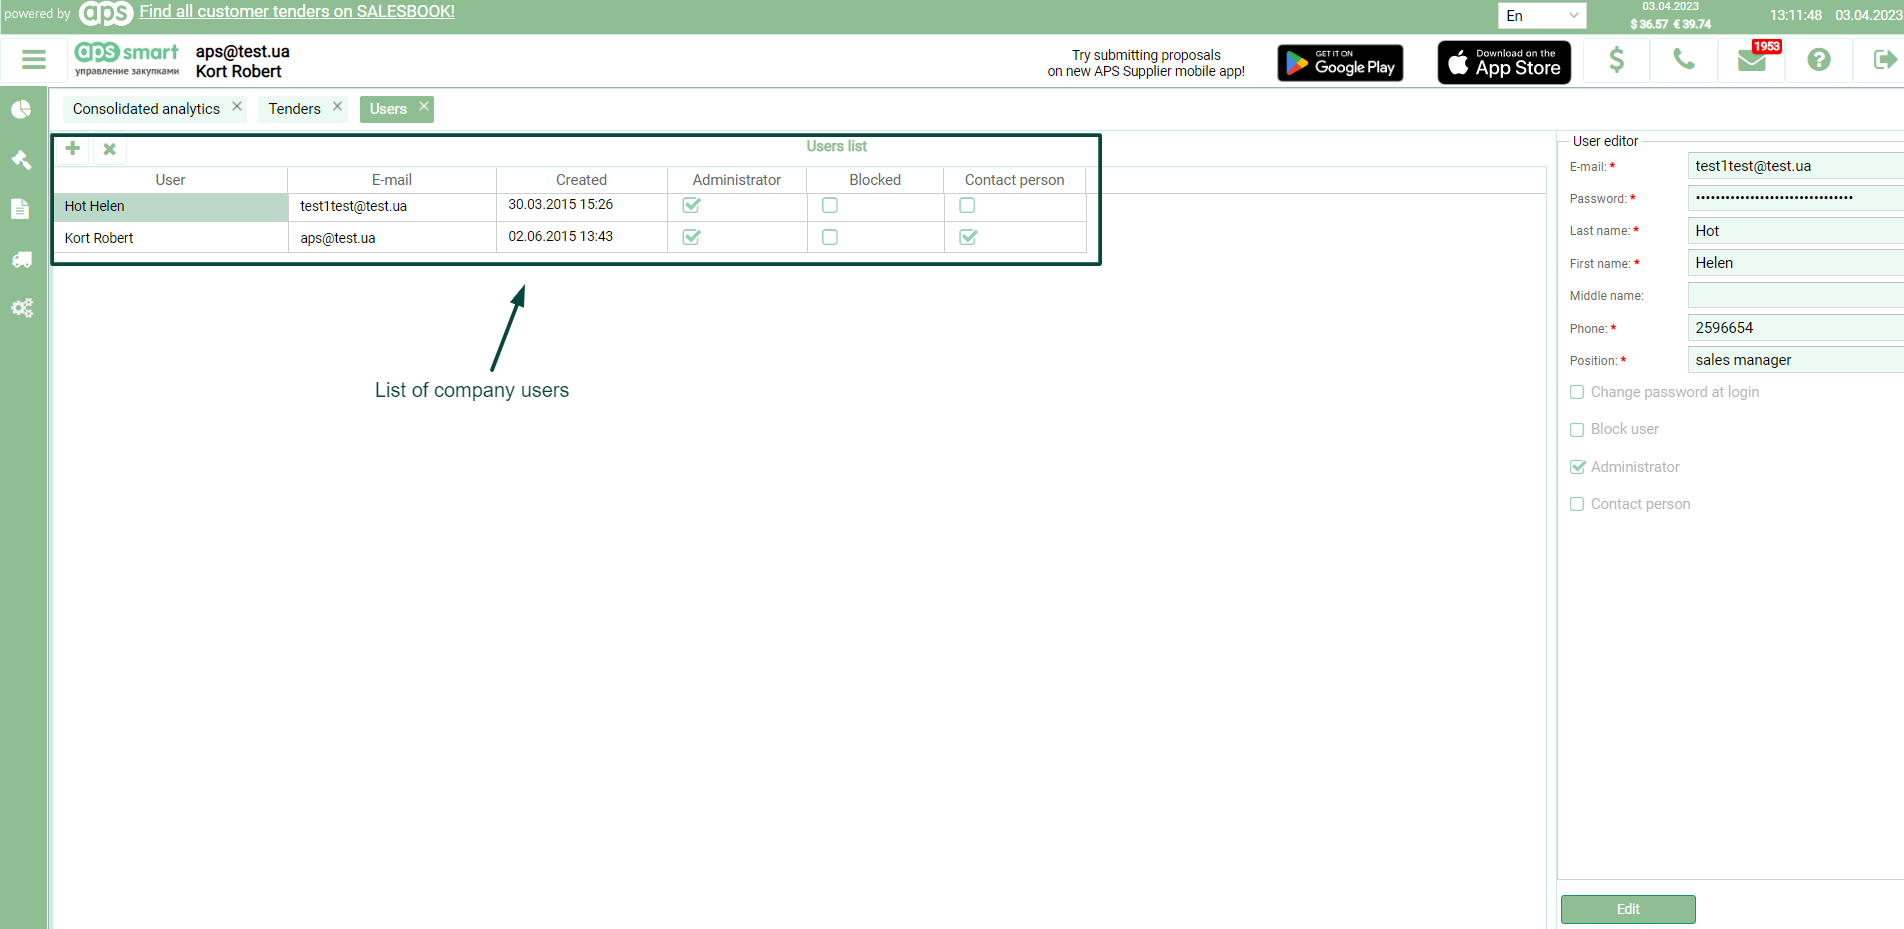
Picture 3
To delete a user from the system, you need to select the user and press the delete button "x"; the button is located above the list of users (see pic. 4).
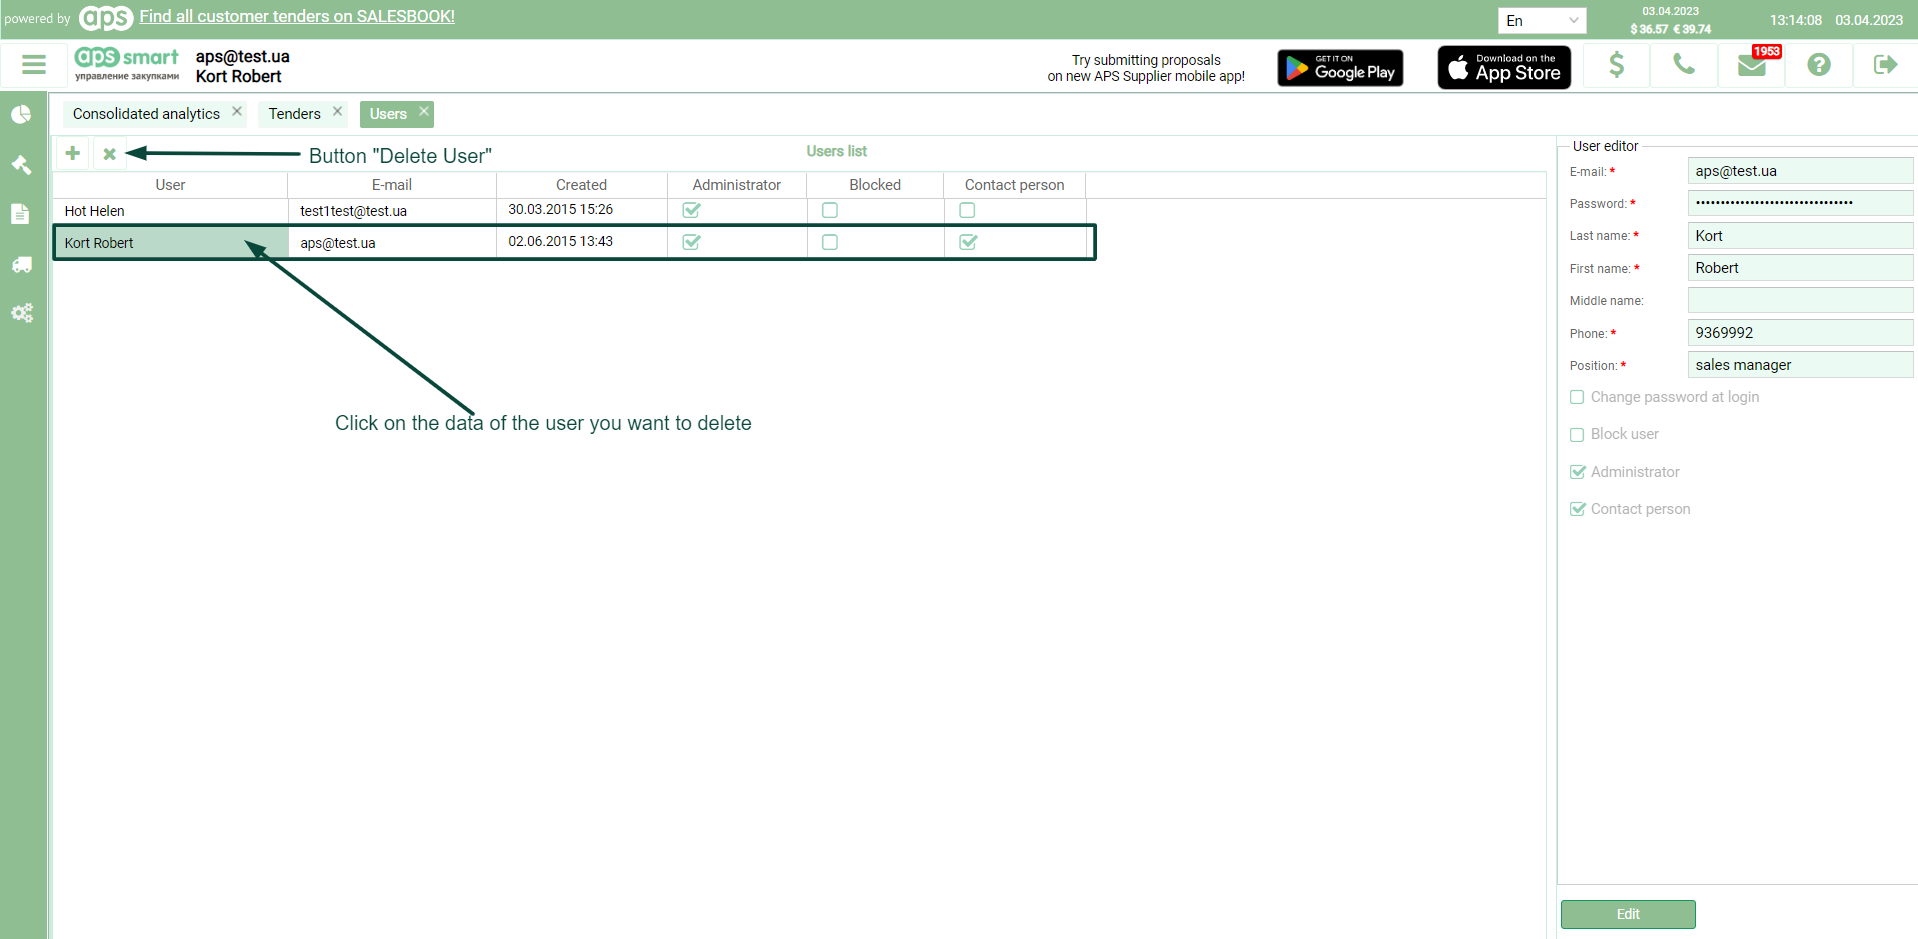
Picture 4
If you are authorized in the system as the only user with "Administrator" rights, deletion will not be possible (see pic. 5).
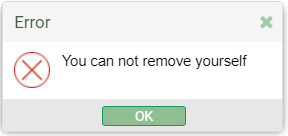
Picture 5
It is not possible to delete your profile from the system from your personal account.
If there is more than one user with the "Administrator" right, it is possible to remove yourself as a user.
WARNING! If only one user is registered in the system, the delete button will not be available (see pic. 6).

Picture 6
Tender module
You have to log in to the contractor's user account (see pic. 1).

Picture 1
Open the "Tender" section - "Active tenders".
In the right-hand "Filter" section, enter the tender number in the "No" field (see pic. 2).
Open the necessary tender by clicking on the name of the tender in the dialog box.

Picture 2
In the open tender window, open the "Tender details" sidebar on the right, select the "Actions" sub-section and click the "Confirm your offer" button (see pic. 3).
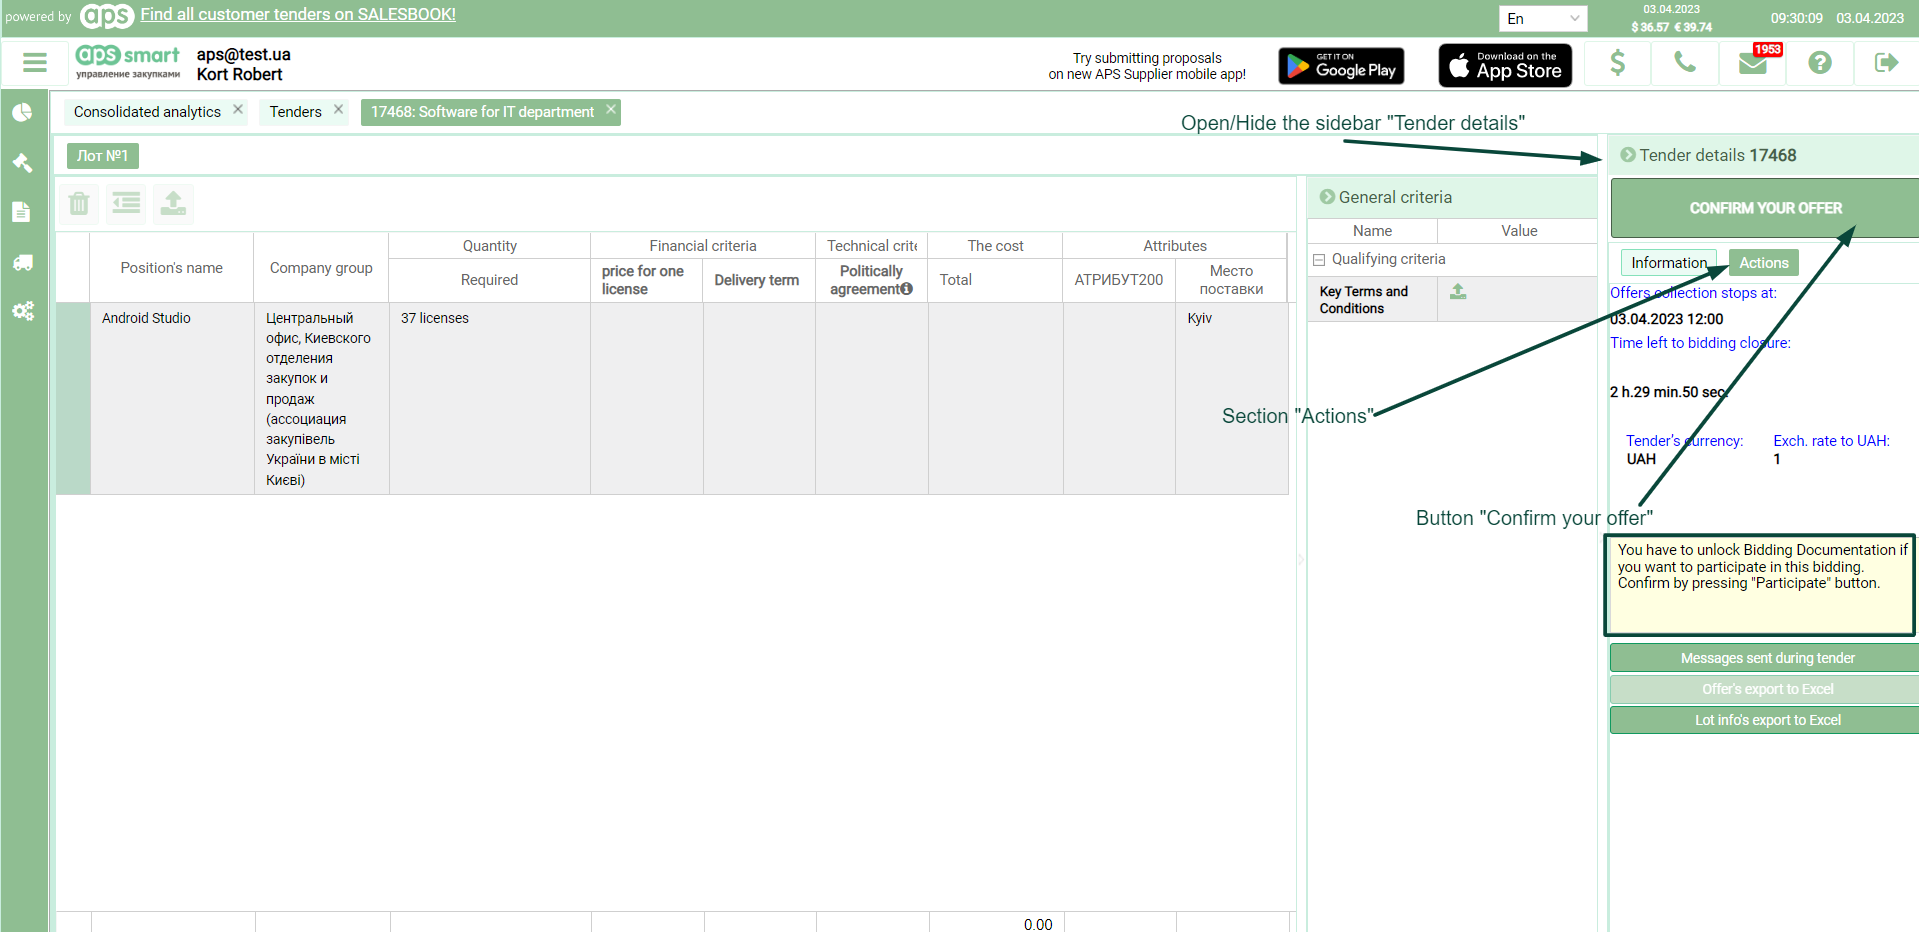
Picture 3
Fill in the required criteria and click the "Confirm your offer" button (see pic. 4).
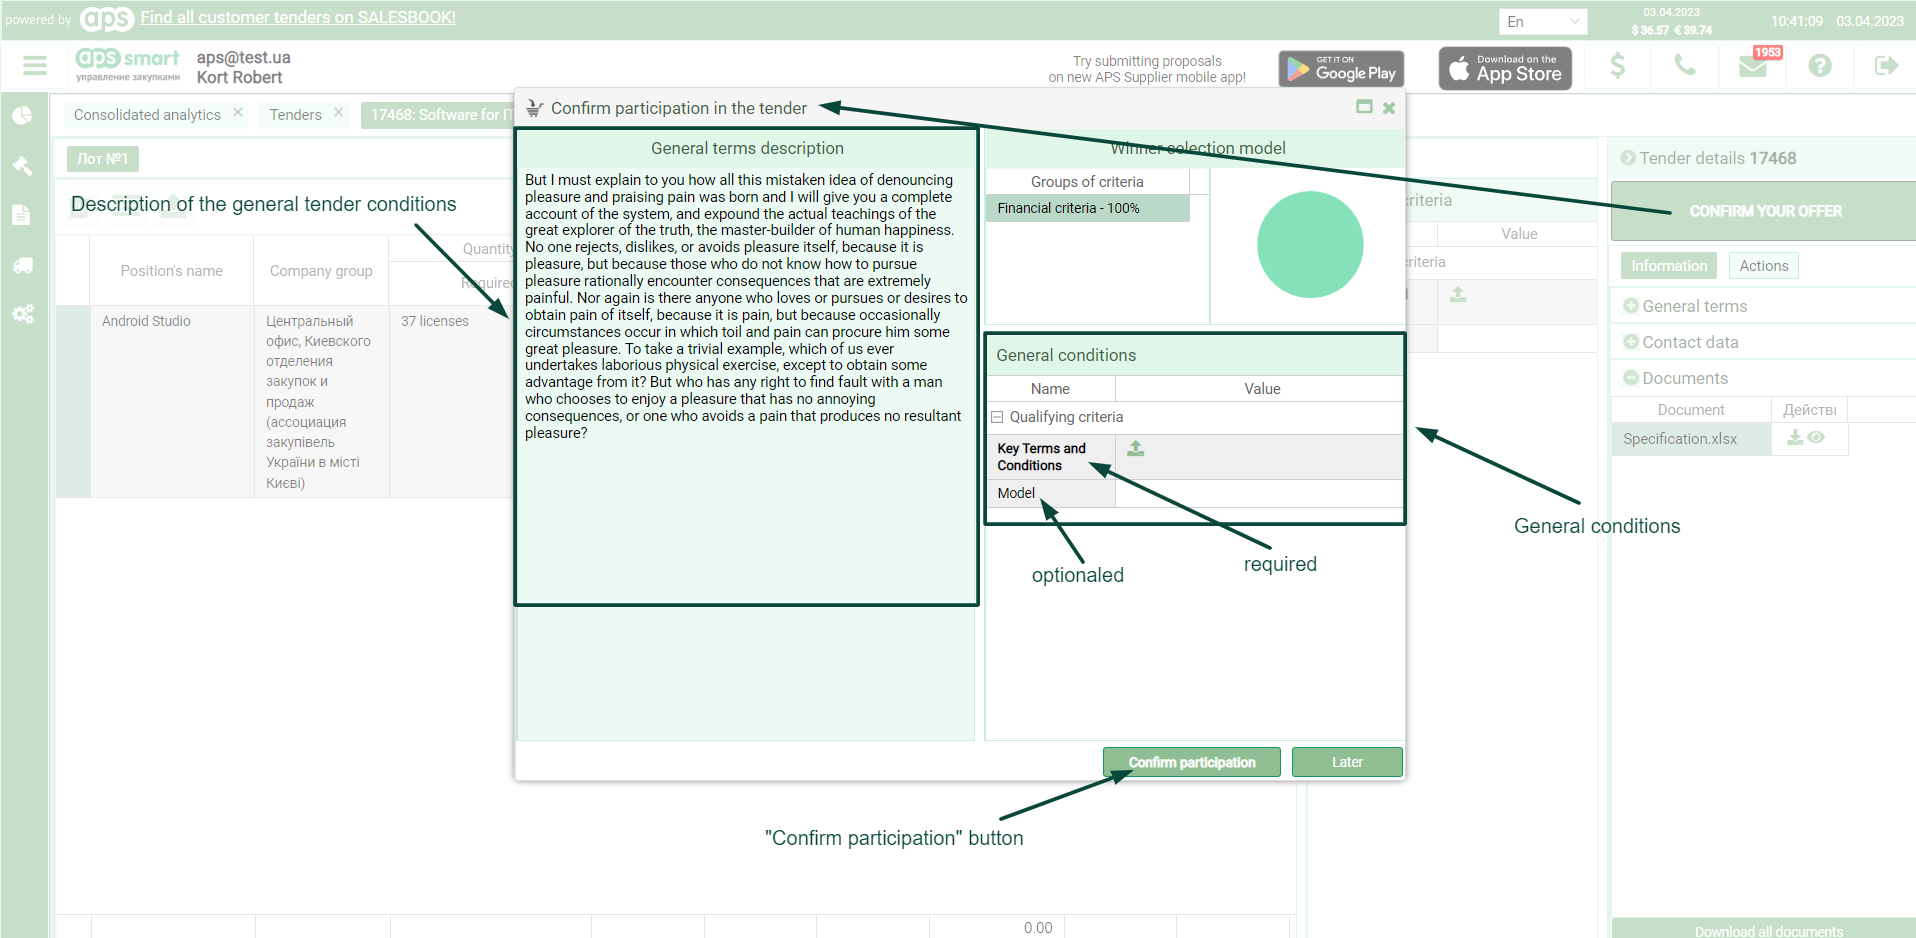
Picture 4
-
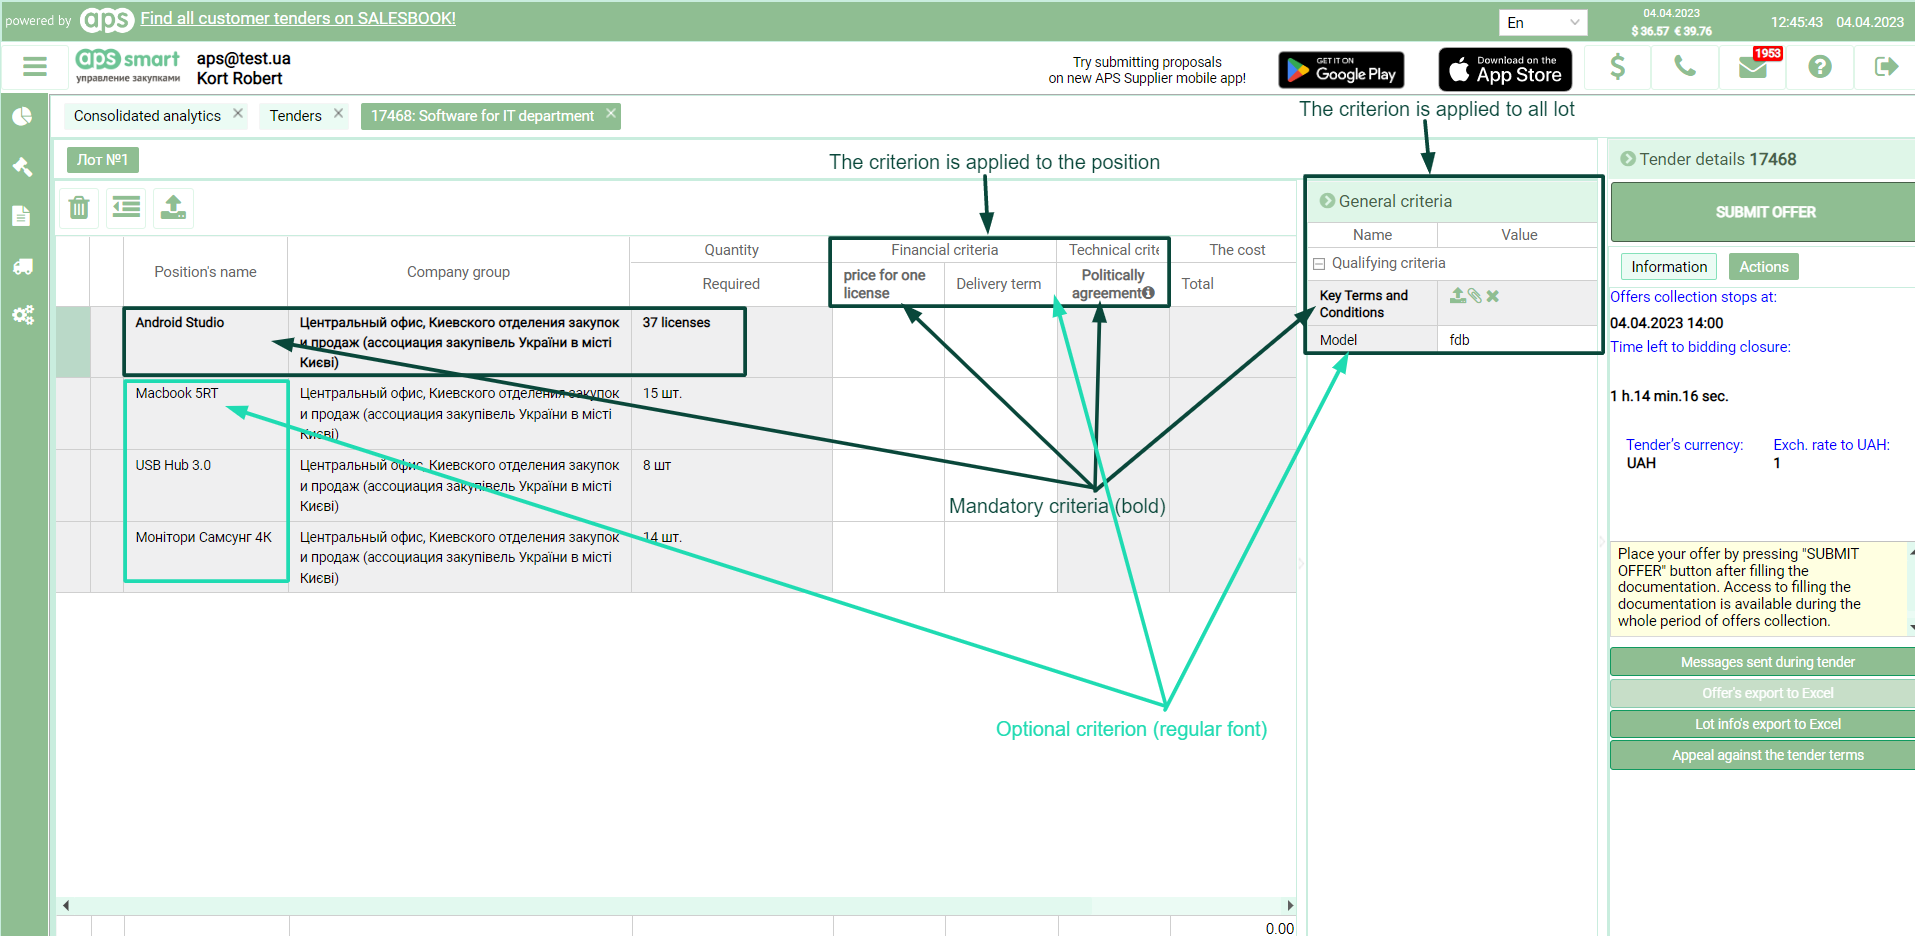
When entering the tender, the contractor is shown a pop-up window (the bidding time must already have started) in which the general criteria for the entire tender are displayed (if any), and required mandatory criteria are highlighted in bold font style (see pic. 1).
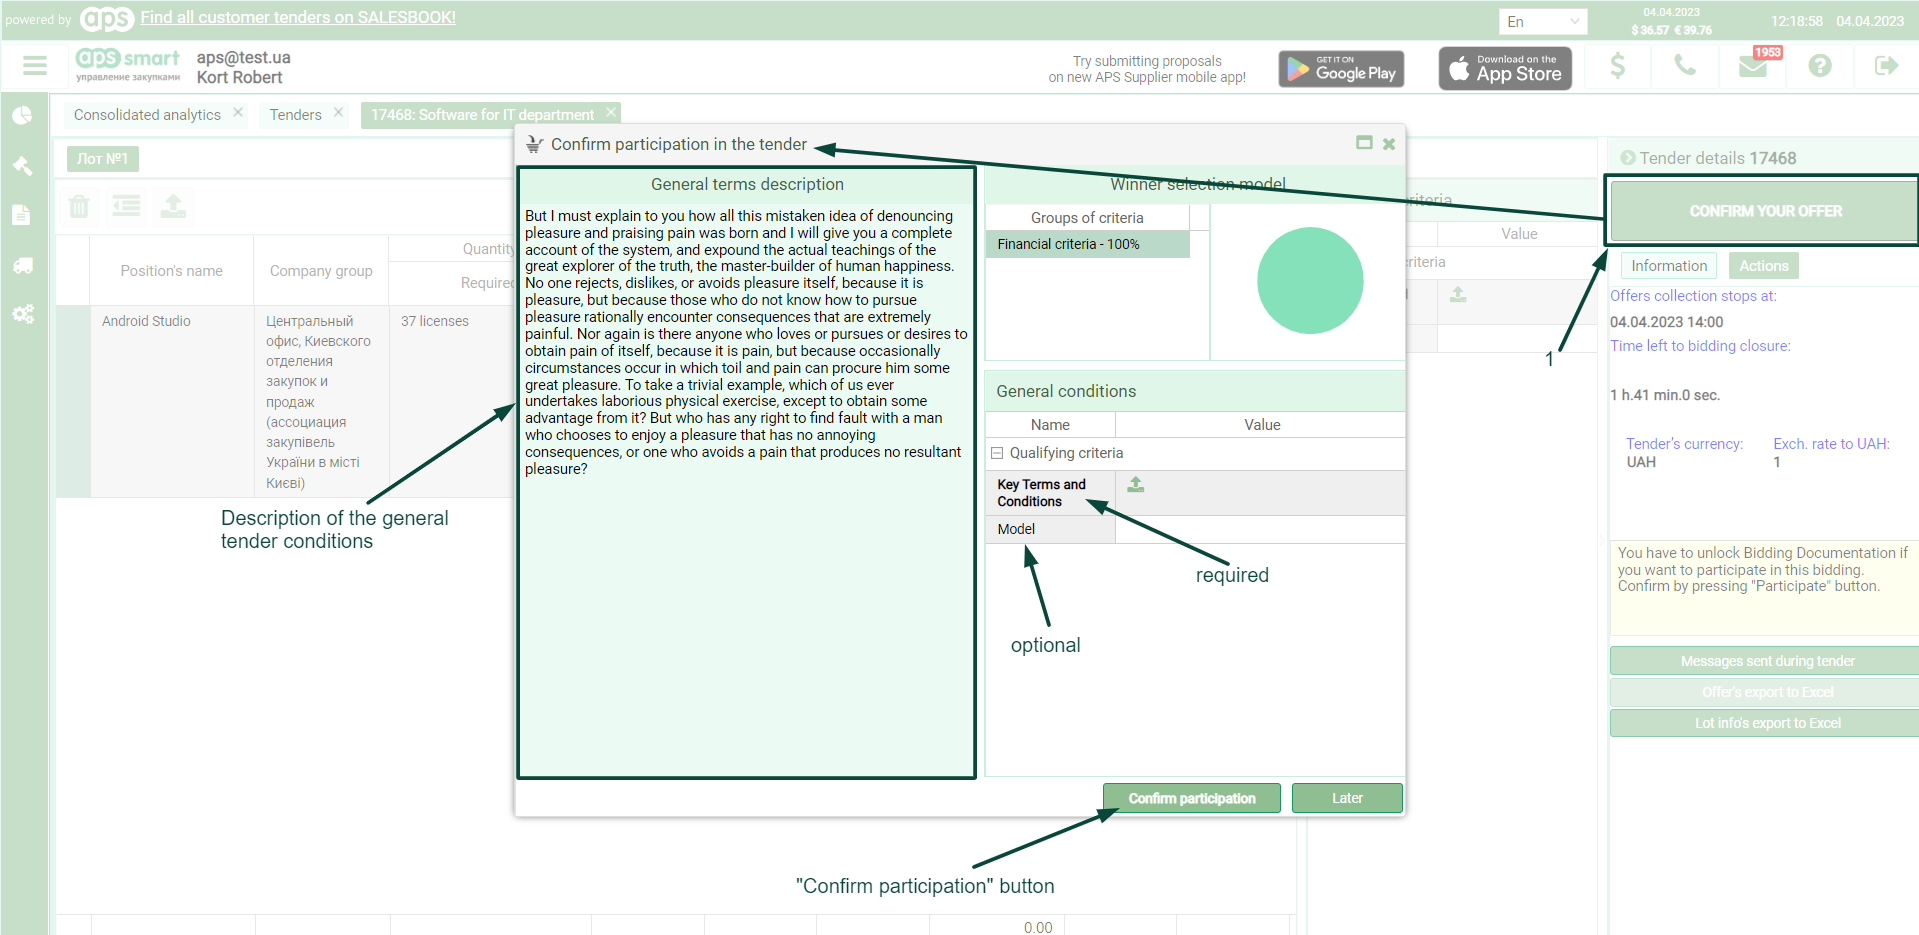
Picture 1
To take part in the tender, you have to confirm your desire to participate in the "Confirm participation in the tender" pop-up window.
-
The tender contains individual and mandatory criteria for positions, as well as mandatory and optional positions; mandatory ones are highlighted in bold (see pic. 2).
Picture 2
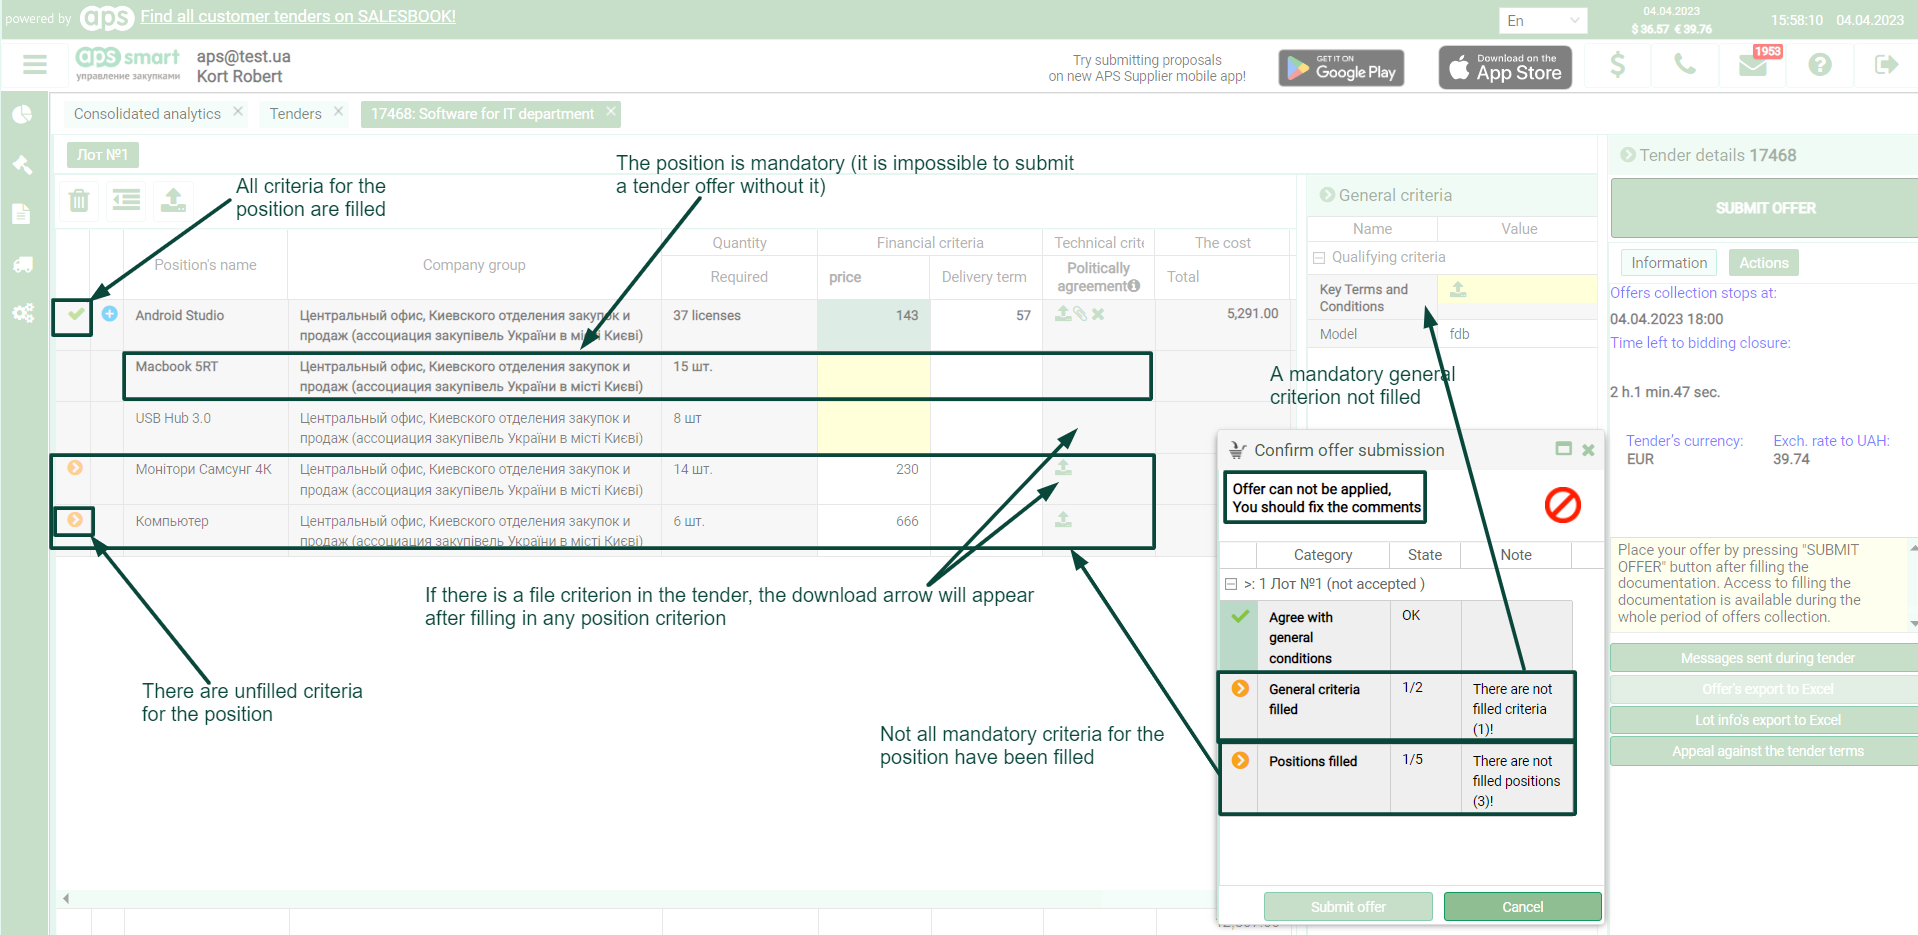
In order to submit an offer, all mandatory criteria (both general and individual) must be filled in for all mandatory positions, or at least for one of the positions (if there are no mandatory positions) (see pic. 3). Mandatory criteria for all positions for which the contractor wants to submit an offer must also be filled in.
Picture 3
A mandatory criterion (highlighted if not all the conditions for submitting a proposal are met, and the window "Confirmation of the proposal submission" is opened)
The icon indicates that not all of the required criteria are filled in for the position
Unfilled positions (for one position filling in is not completed, another position is mandatory to be filled in).
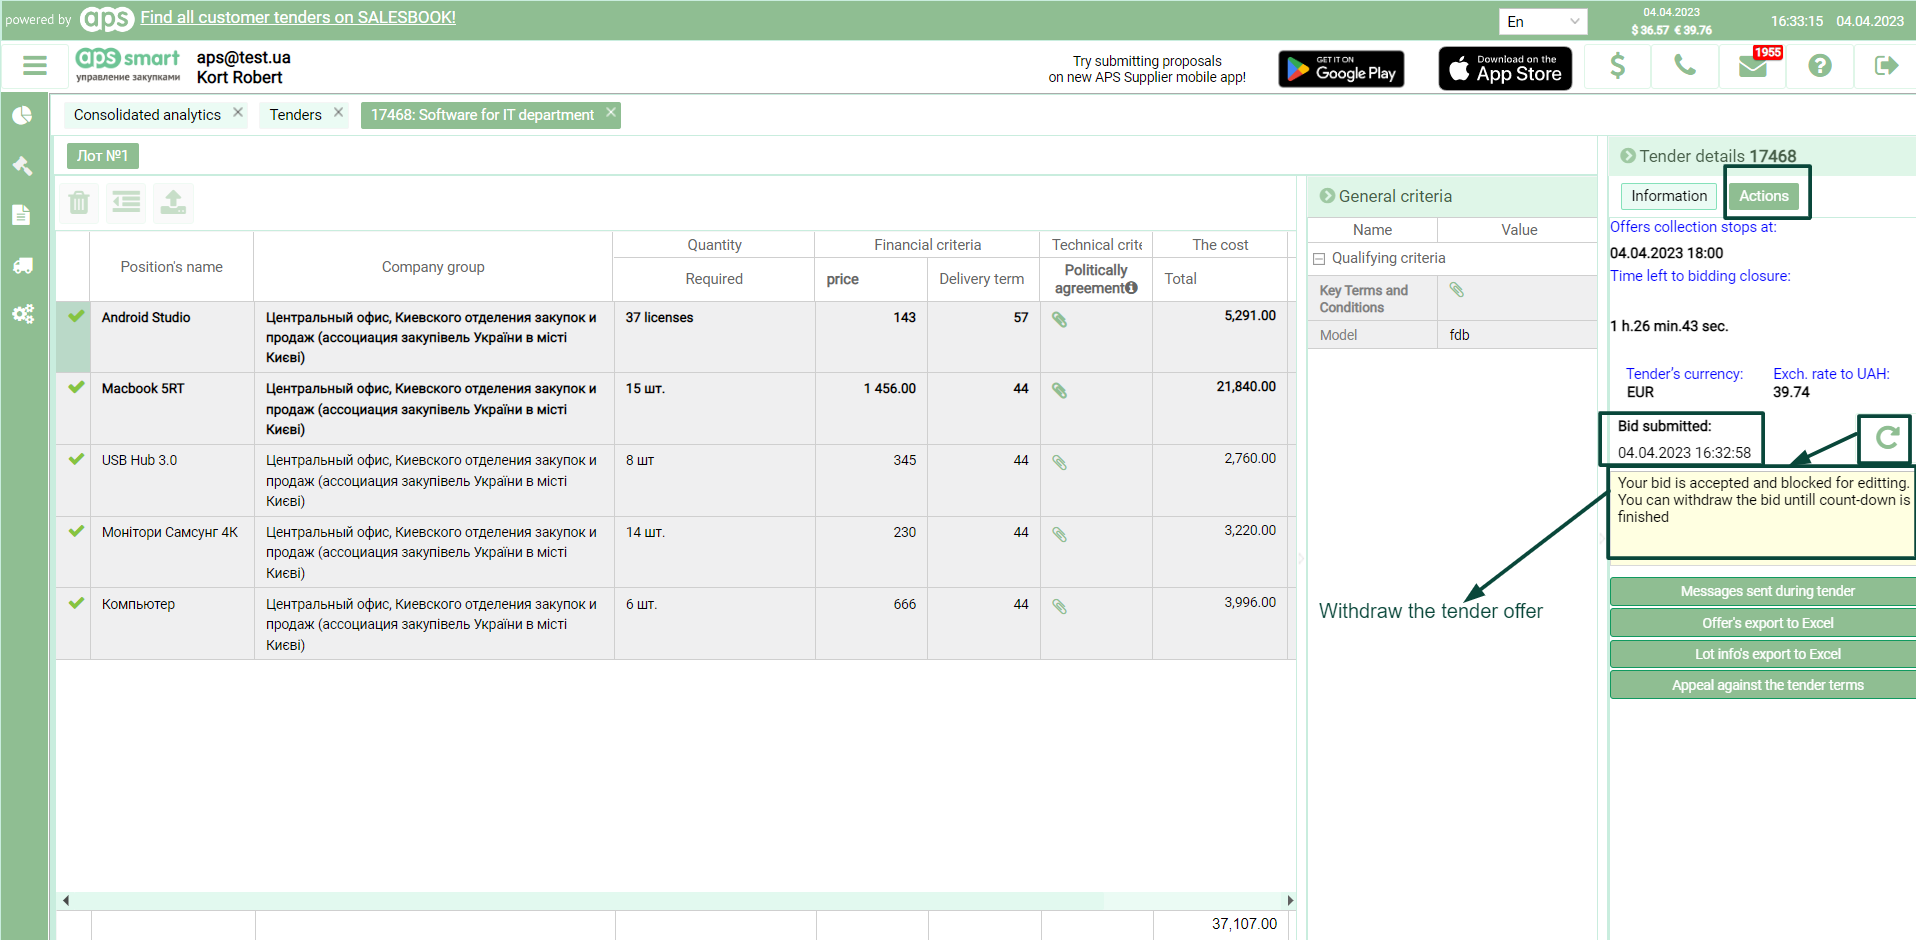
When you press the "Submit offer" button, a pop-up window opens (see pic. 3), displaying information on the filled-in criteria and the need to fill in the mandatory criteria/positions that were not filled in (if any). If all conditions are met, the "Submit offer" button in the pop-up window becomes active; when you click on it, the offer gets registered by the system, and the Withdraw the tender offer button is displayed on the "Tender details" sidebar - the "Actions" tab - instead of the "Submit offer" button - (see pic. 4), and editing the tender criteria becomes unavailable.
Picture 4
- In order to withdraw the order, you should press the withdraw the bid button (see pic. 4). At the same time, all previously filled criteria will remain, and it will be possible: either to delete irrelevant ones or to add previously unfilled ones, before resubmitting the offer.
-
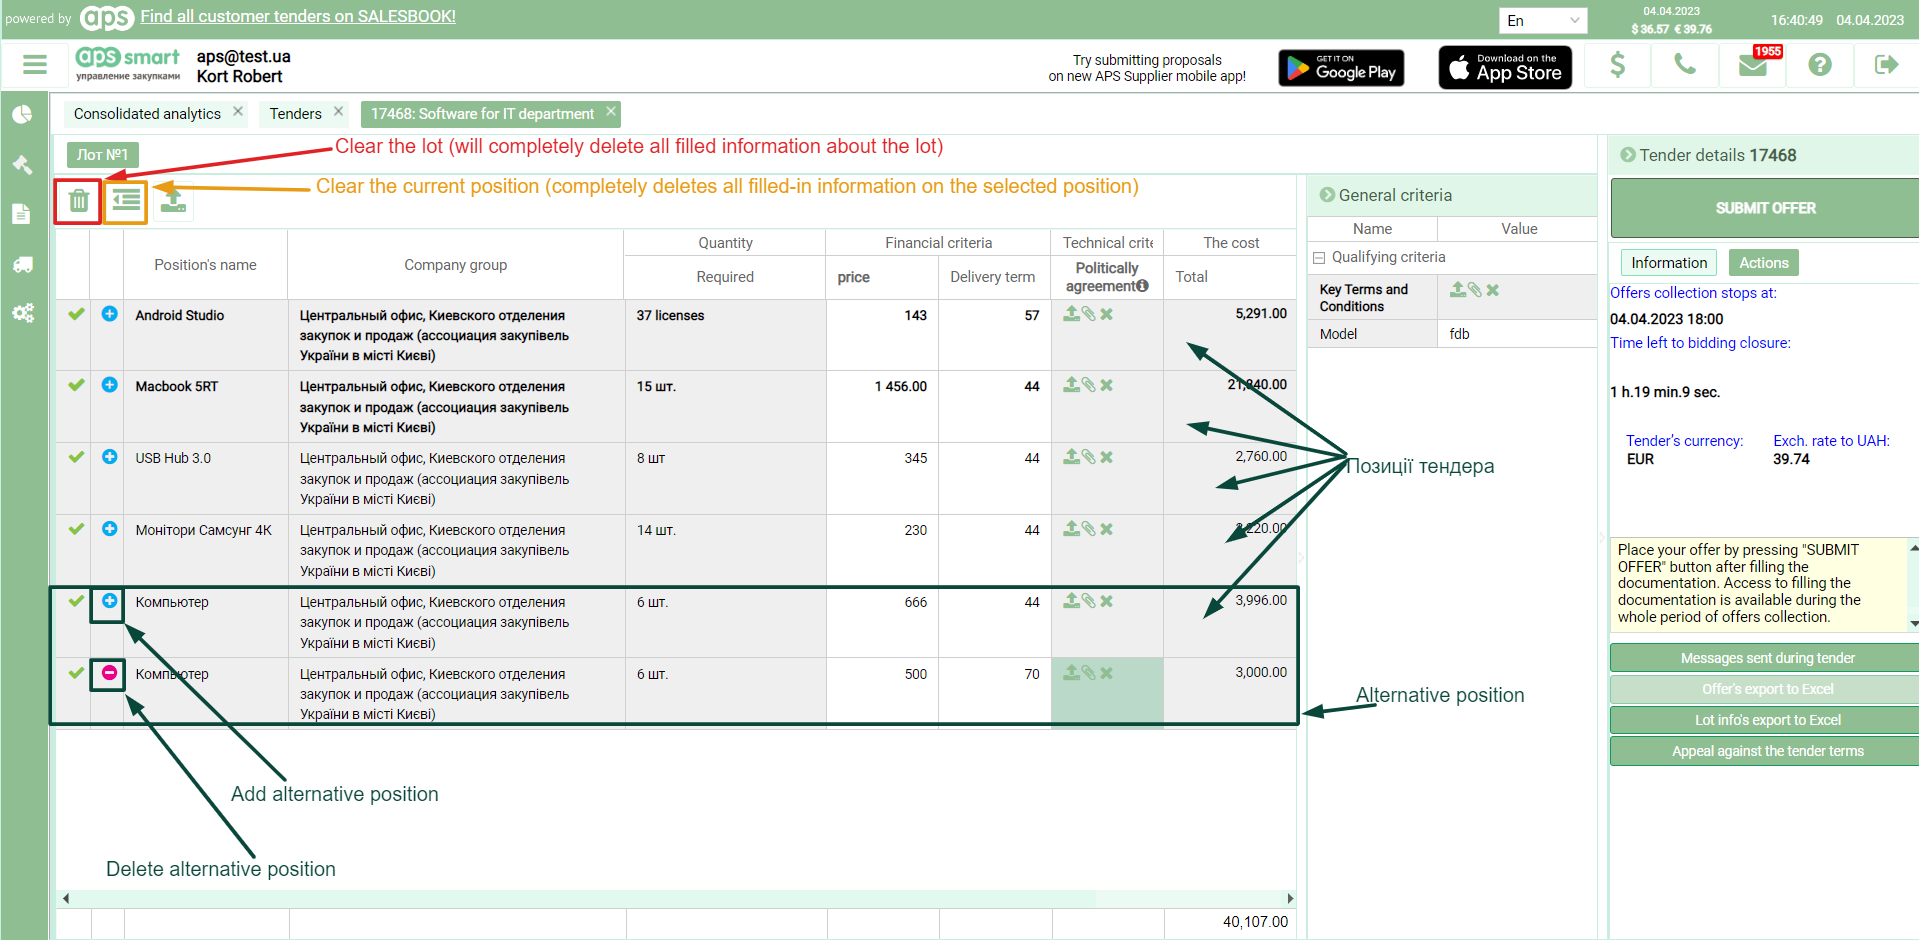
Adding an alternative offer: when all mandatory criteria are filled in, the "Add an alternative offer" button appears on the left (see pic. 5).
Picture 5
When you click on this button, an identical position is added under the current one, in which you can change the criteria, to the left of which the "Delete the alternative position" button is displayed. In order to add several alternative positions, it is necessary to press the appropriate number of times on the "Add an alternative offer" button next to the original position.
-
The proposal can be imported from Excel (see pic. 6), for this, you need to perform the following actions:
- click on the "Positions import from Excel" button, after which a pop-up window will open with the appropriate name;
- download a template containing all positions and individual criteria of the selected lot using the "Download the template" button in the "Positions import from Excel" window;
- then, you need to fill in all the positions of interest in the template, while all the mandatory criteria for the positions must be filled in; otherwise, the data on the corresponding positions will not be added to the system;
- next, you need to load the data from the filled-in template into the open "Positions import from Excel" window, using the button to download the data from the template;
- after all the manipulations, data on all correctly filled positions are added to the table of the import window, and the last action will be clicking the "Import" button. All the filled-in data will be transferred into the contractor’s proposal for the tender, and all that remains is to submit the proposal.
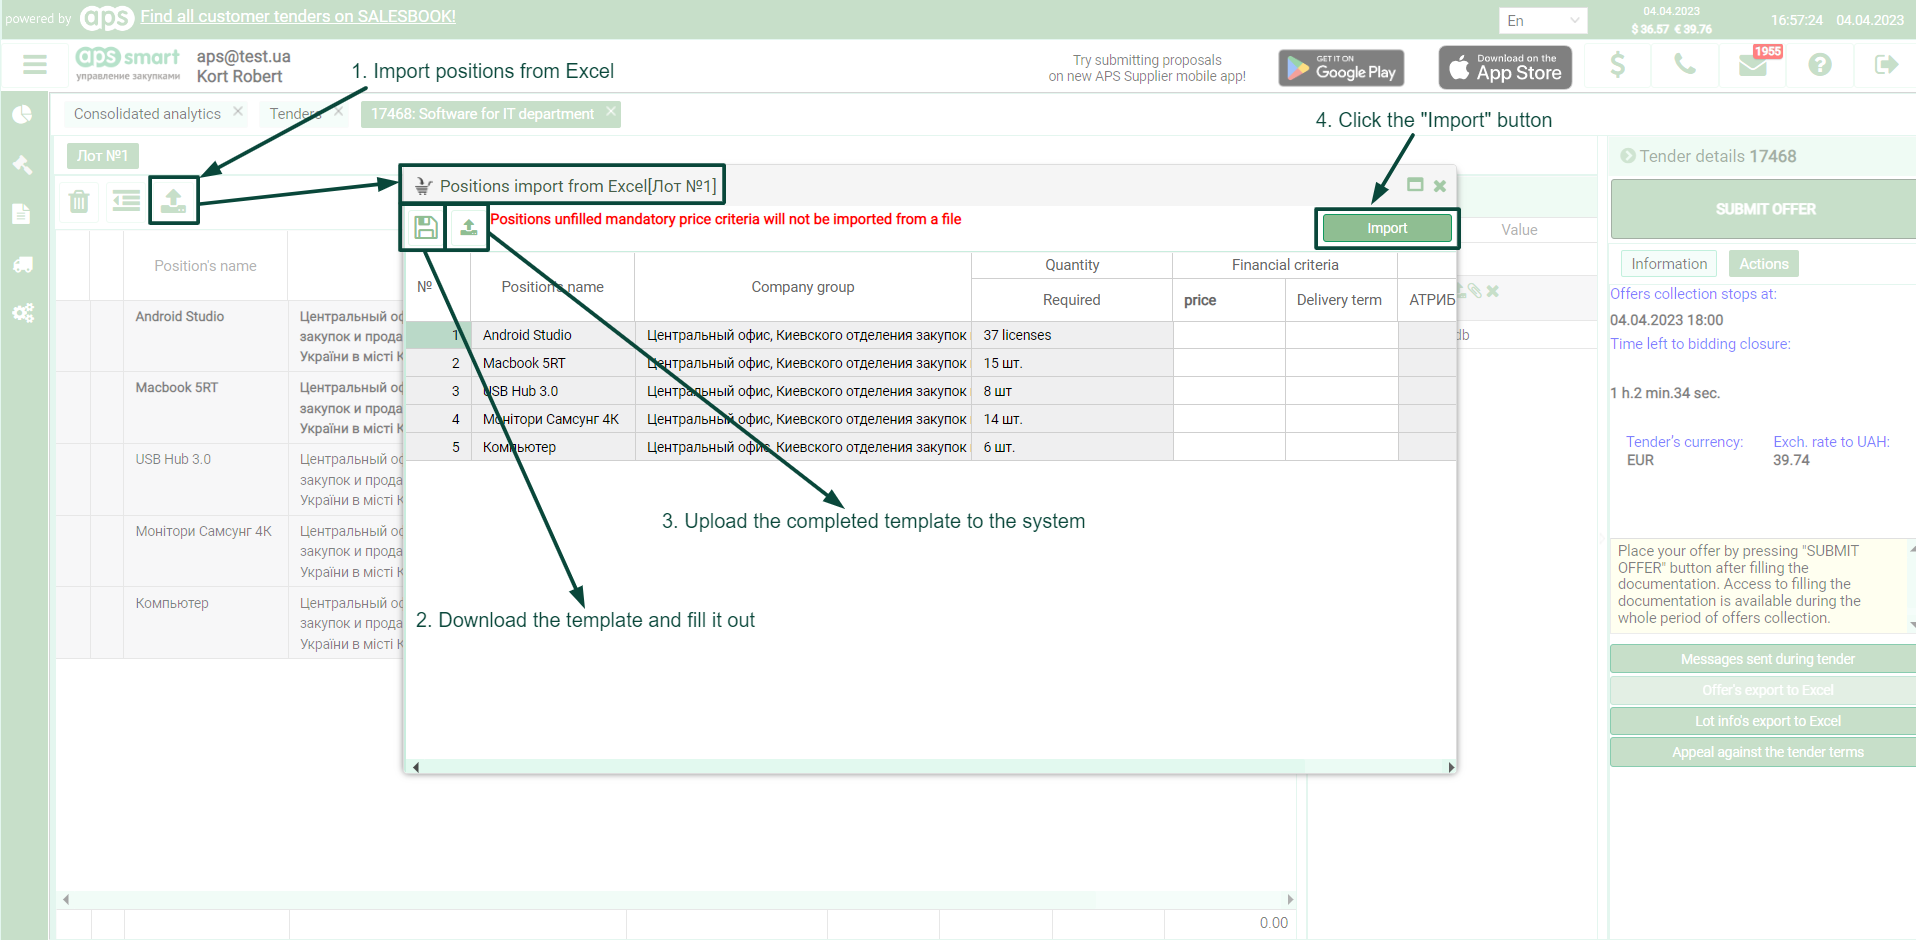
Picture 6
-
To make an offer in the bidding/reduction, it is necessary to enter the value by price category in the specified range and press the BID button (see pic. 1).

Picture 1
You can enter the price in the "Value" column manually by clicking on the limit of the proposed range or by using the "Set" button from the mass bid functionality. Submitted offers cannot be withdrawn. If the proposed value does not fall within the proposed limits, the bid button remains inactive. When using the "instant bet" check box, the "Value" column disappears, and a contractor can make a bet only by clicking on one of the limits of the range or using the mass bids functionality.
-
To submit offers, you can use the mass bids functionality. With mass bids:
- the "Set" button sets the price for all positions of the "Value" column, within the range, according to the current position of the slider;
- the "Bid" button transfers all the entered offers of the contractor from the "Value" column into the system; if some offers do not fall into the range of values, then these offers are not entered into the system;
- when using the "Instant bid" check box for the mass bid, the Set button becomes inactive, and the "Value" column disappears while pressing the "Bid" button - sets the contractor's offer for all positions within the range of values, and in accordance with the current position of the slider.
- Log in to the contractor's account.
- "Tenders" > "Active tenders" (Completed, Archive).
- Open the tender window by double-clicking on the tender name field.
- Select the "Information" section and the "Contact data" block in the right-hand drop-down "Tender details" sidebar.
- Tender owner's full name, telephone, email, division, and category (see pic. 1).
- If the specified section is empty, the tender owner has made this information unavailable for viewing.

Picture 1
If you upload too many documents, only the last file will be saved in the system. It is recommended to create an archive of the necessary documents (see pic. 1).
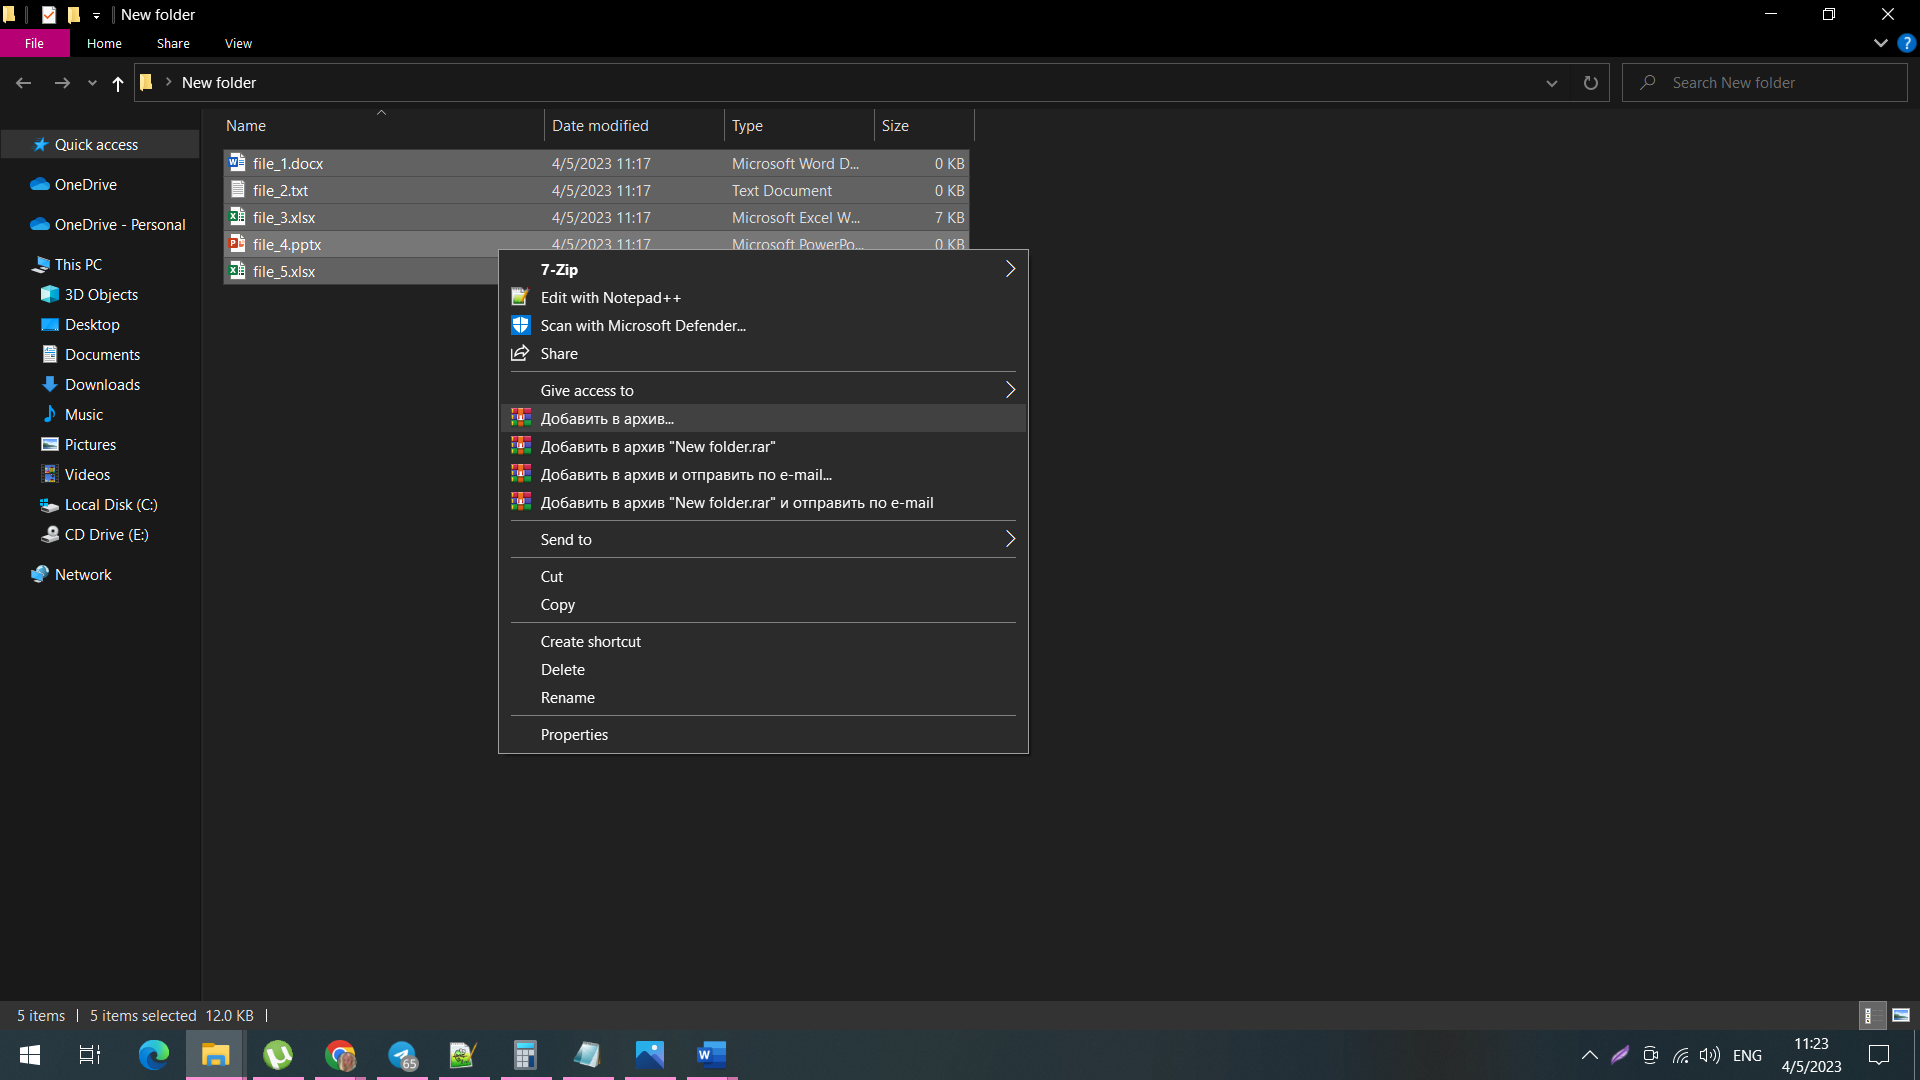
Picture 1
And download the archive by clicking on the file criterion field (see pic. 2).

Picture 2
We recommend using the following program for file archiving - www.win-rar.com.
(Provided that the tender is completed)
- Log in to the contractor's user account.
- Open the "Tenders" module - the "Completed tenders" block.
- When the list of "Completed tenders" tenders opens, choose and open the one you need.
- In the opened window of the topical tender, click the "Tender result" button in the "Tender details" sidebar on the right, the "Actions" section (1) (see pic. 1).
- Information about this tender and your participation results will appear in the open "Tender result" window (2) (see pic. 1).
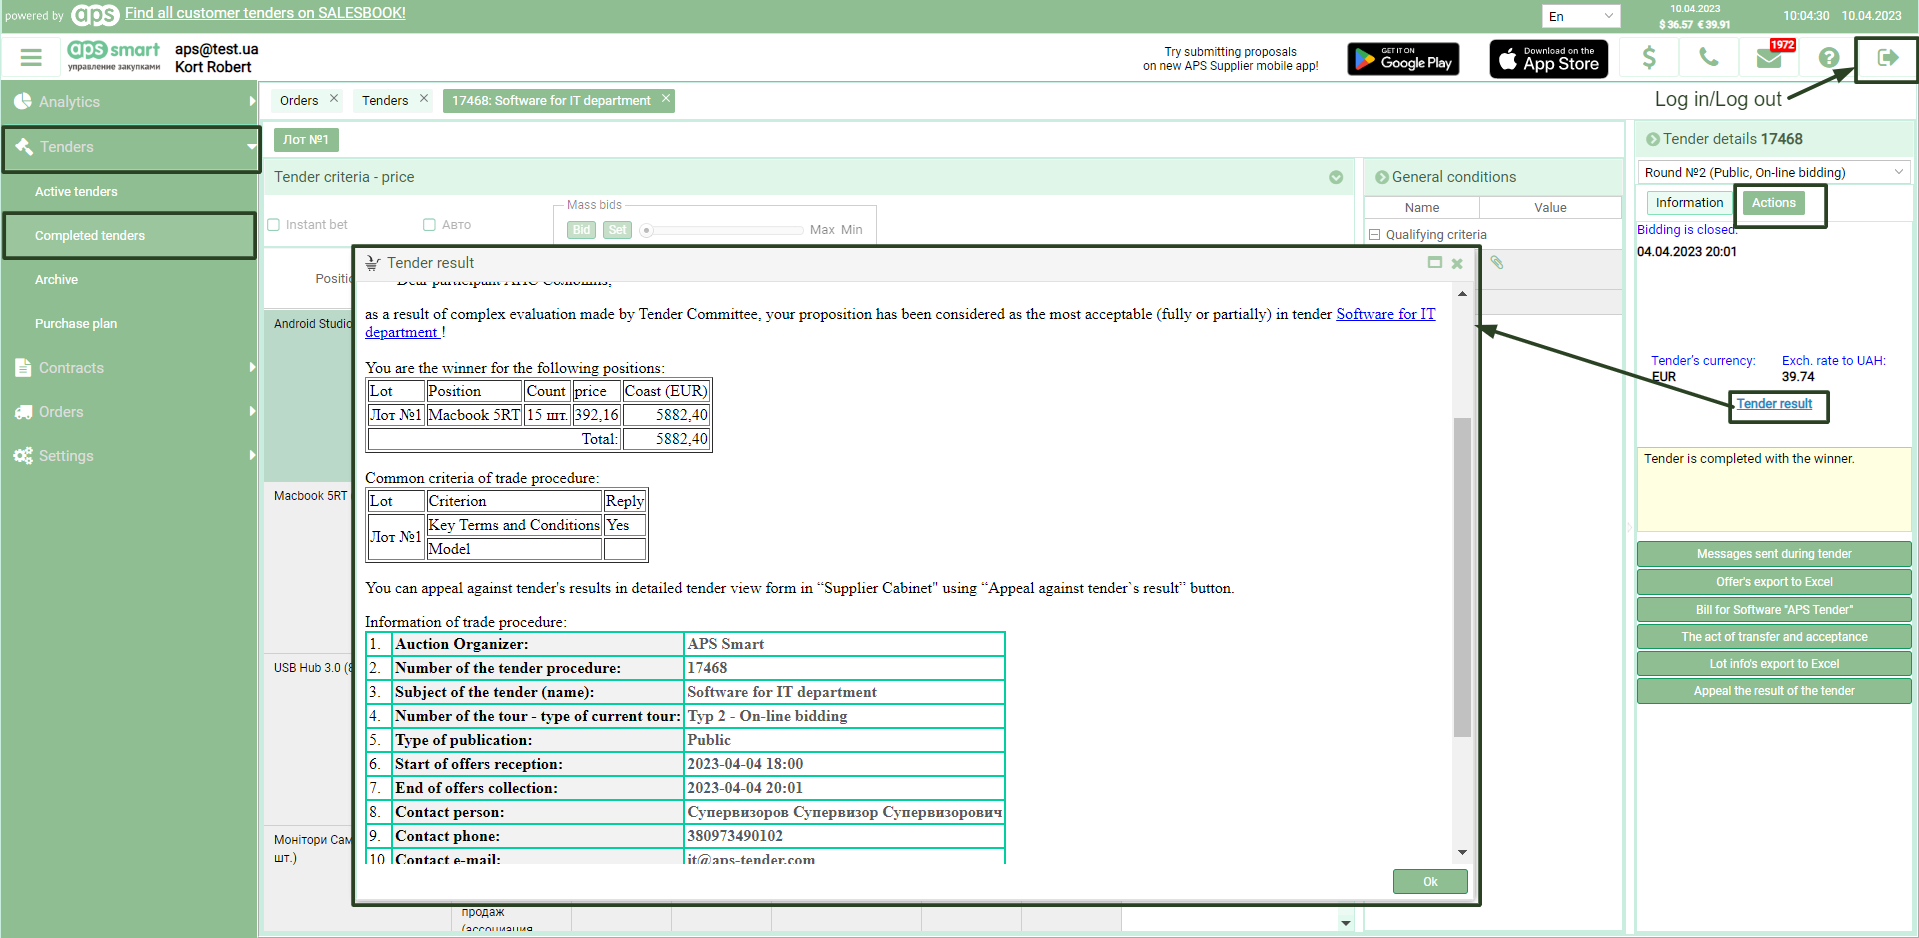
Picture 1
Also, if you submitted an offer to the tender, you might be sent a message by internal mail about its results. Here is how to view messages:
- Log in to the contractor's user account.
- Open the "Messages" module, and find the message with the name of the necessary tender, which is provided in the "Subject" column (see pic. 2).
- Open the message for viewing by double-clicking the message field.
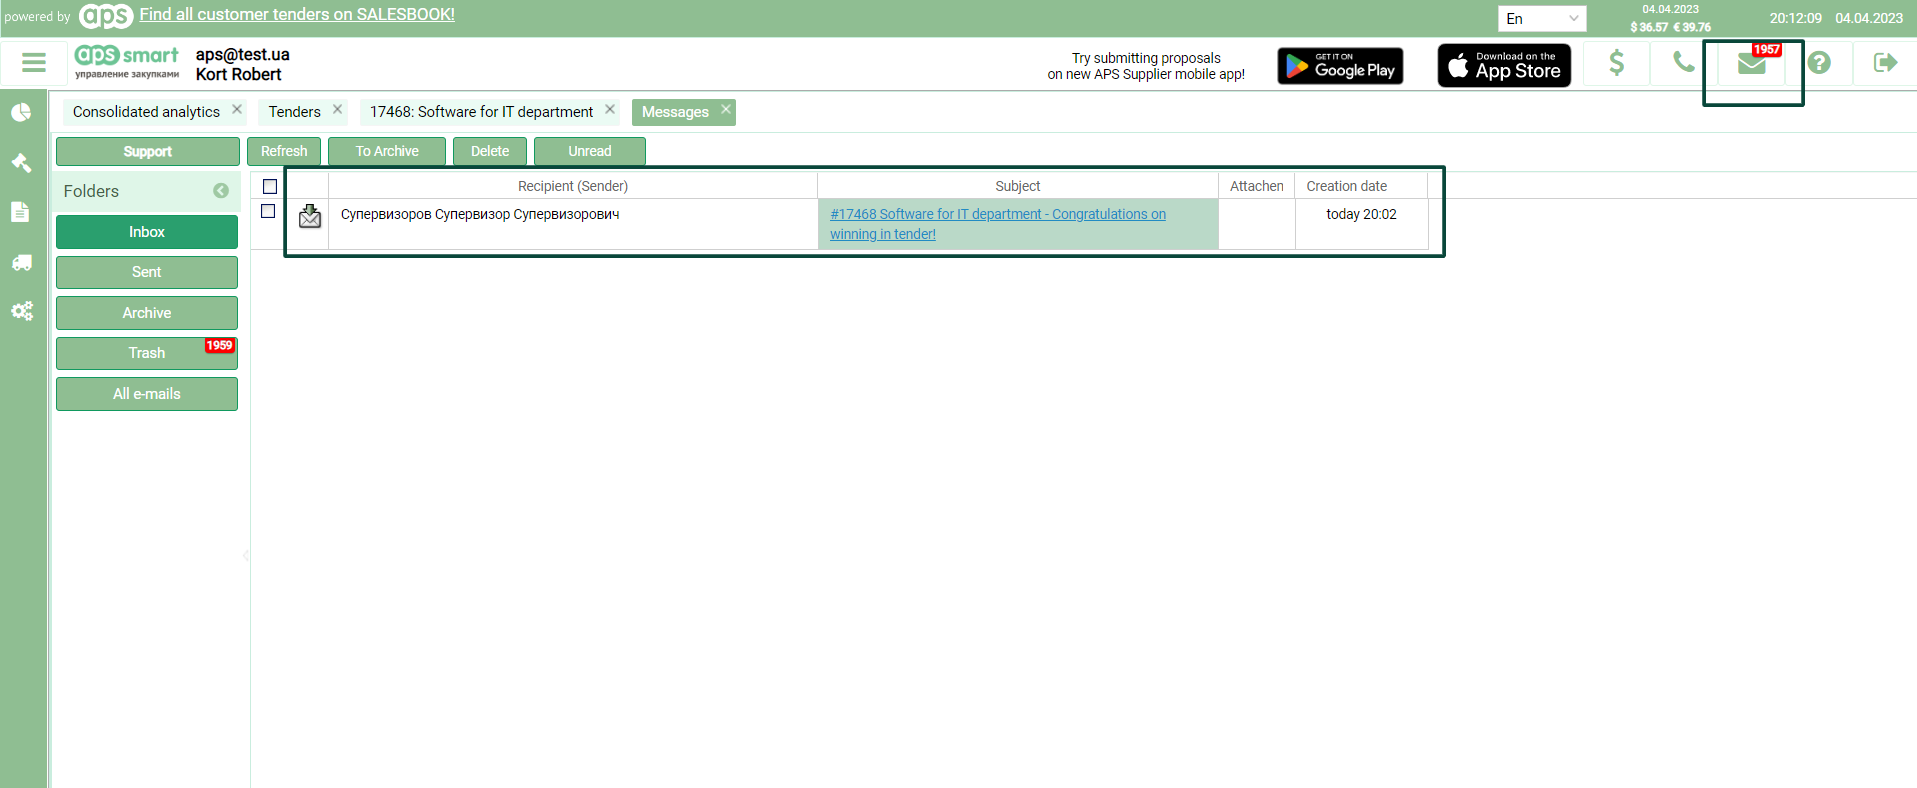
Picture 2
(Only if you took part in the auction, lost, and the Customer provides such information to the participants)
- Log in to the contractor's account.
- Click the "Tenders" module > the "Completed tenders" section.
-
Select the necessary tender by double-clicking on the tender field or by single-clicking on the name of the tender (see pic. 1).

Picture 1
-
In the open tender menu, in the "Tender details" right-hand sidebar, click the "Appeal the result of the tender" button 2 (see pic. 2).

Picture 2
-
After clicking the button, the "New message" window will open, in which you can describe your position in detail and send this information to the tender owners (see pic. 3).

Picture 3
Contract module
Being logged into a contractor’s user account, it is not possible to edit the text of the contract template on the part of the contractor; it is only possible to view it. But at the same time, there is an opportunity to contact the buyer using the chat located on the contract review tab to resolve the issue. (see pic 1).
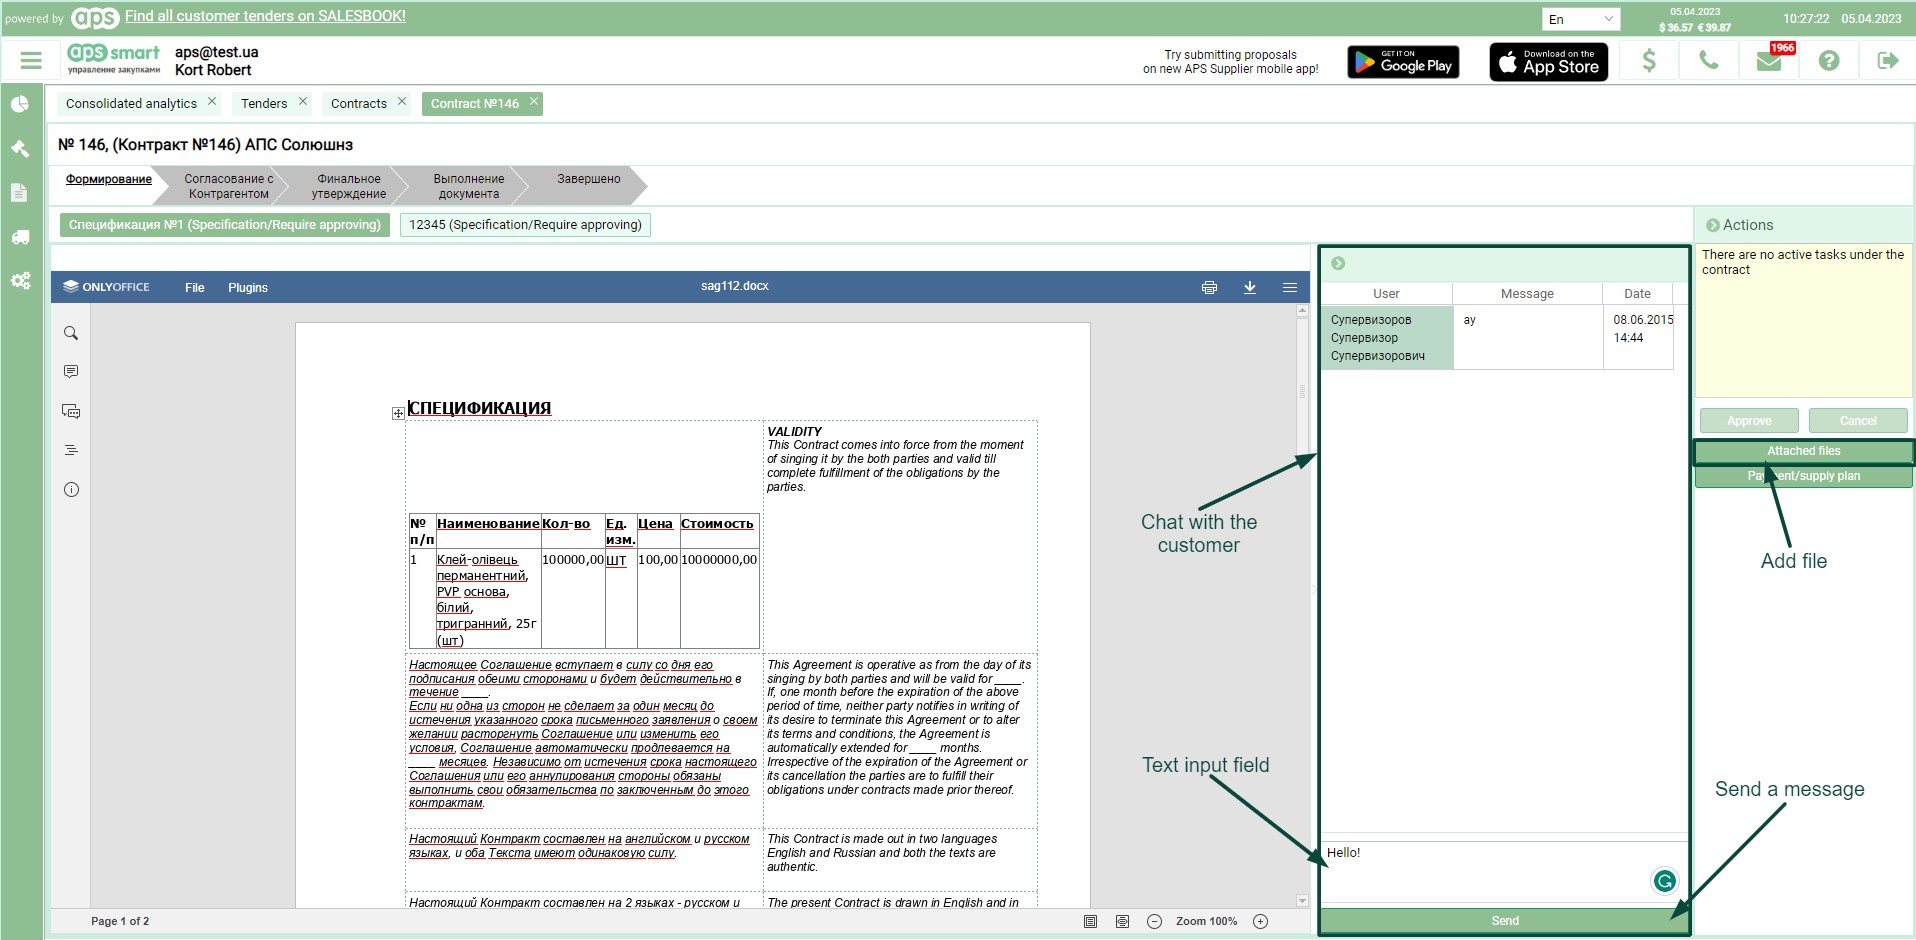
Picture 1
At the "Negotiating with the contractor" stage of the contract, the contractor can also attach their version of the template via "Attached files" (see pic 2).
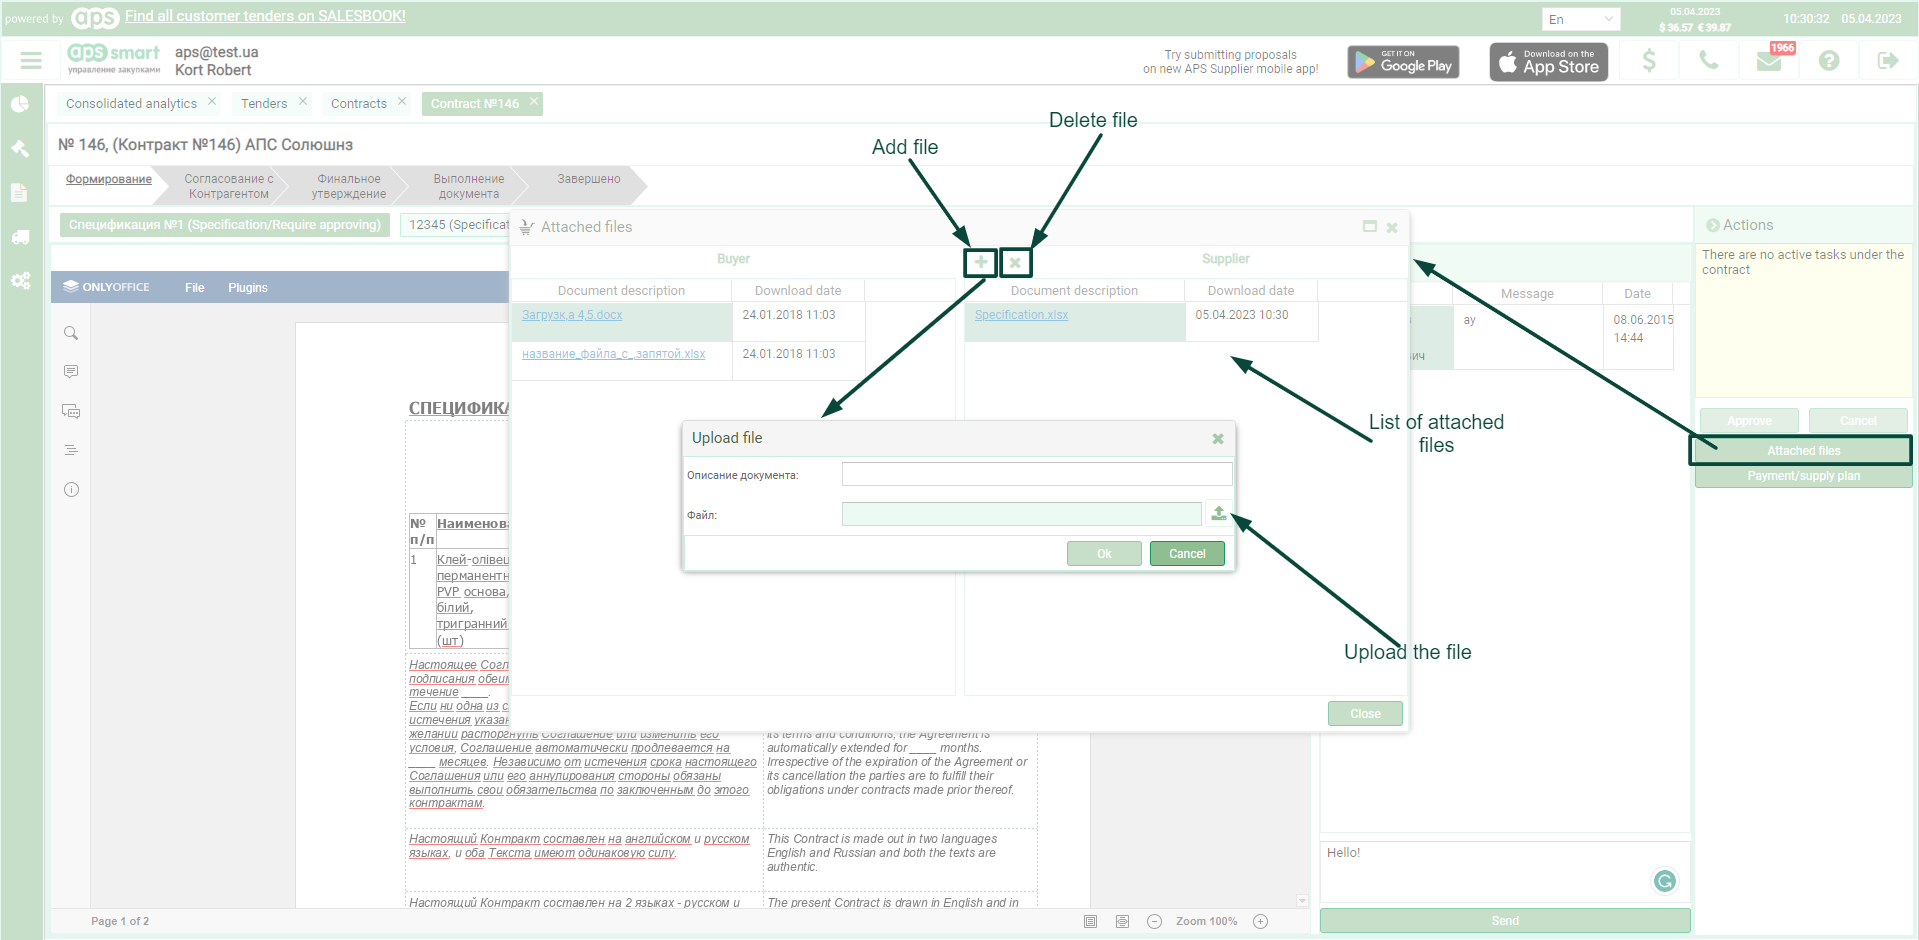
Picture 2
After reaching agreements, at the "Final approval" stage of the contract, the author of the contract, or the person authorized to approve, if such person has the necessary rights, can make amendments to the text of the template.
Order module
- Log in to the contractor's user account.
- In the left-hand sidebar, select the "Order" module, the "Pending" block.
- On the page with lists of orders, open the necessary order by clicking on the name of the order or double-clicking on the order field.
- There is a table of positions in the opened order menu; double-click on the position field to open the "Position editing" window (see pic. 1).
-
There are the following fields for editing in the open "Position editing" window:
— the "VAT rate" field, where you can select a rate.
— the "Delivery date" field, where you can change the delivery date of positions in the day/month/year format.
5.1. There are two fields in the "Quantity" section: "Ordered" - the field displays the actual number of positions ordered by the "Buyer."
"Confirmed" - the field is available for editing by the contractor; when editing this field, the quantity in the "Confirmed" field cannot exceed the quantity specified in the "Ordered" field.
5.2. There are also two fields in the "Price" section: "Ordered" - reflects the purchase price for positions set by the procurement.
"Confirmed" is a field where the supplier can change the price to either higher than the set one or lower.
- Confirm the changes made by clicking on the "Ok" button, which is located at the bottom of the "Position editing" window.
- To proceed to the next stage of order approval, click the "Approve" button located in the "Actions" section on the right.

Picture 1
- You need to log into the contractor's user account first.
- Select the "Orders" module in the sidebar on the left; depending on the stage of your order, choose the "Require confirmation," "Confirmation by the customer," or "Execution" block.
- On the page with order lists, open the necessary order by clicking on the name of the order or double-clicking on the order field.
- In the upper left corner of the "Items" table, there is a button in the form of two "show/hide chat" dialog boxes; when you click on it, a pull-out "Chat" window opens to the right of the table (see pic. 1).
- In the chat window, the history of correspondence with the buyer is displayed, and the bottom field is for entering messages. After entering the text, you need to press the "Send" button, which is located at the bottom of the chat window.
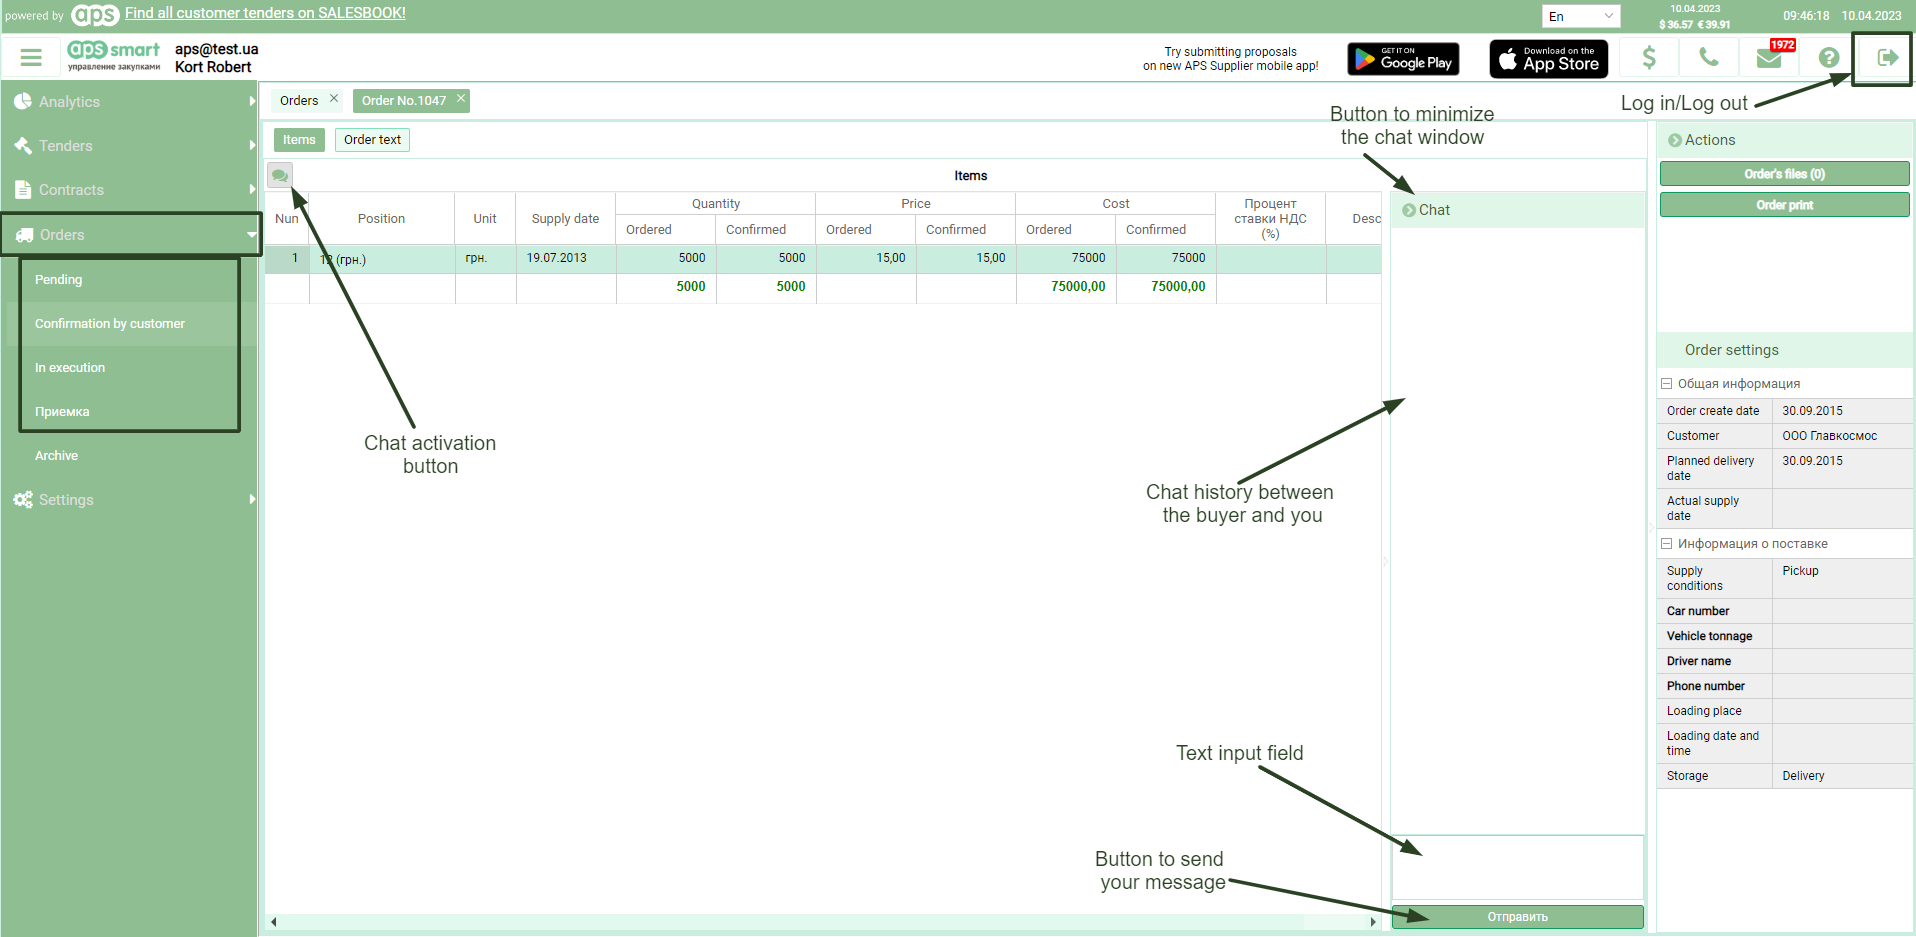
Picture 1